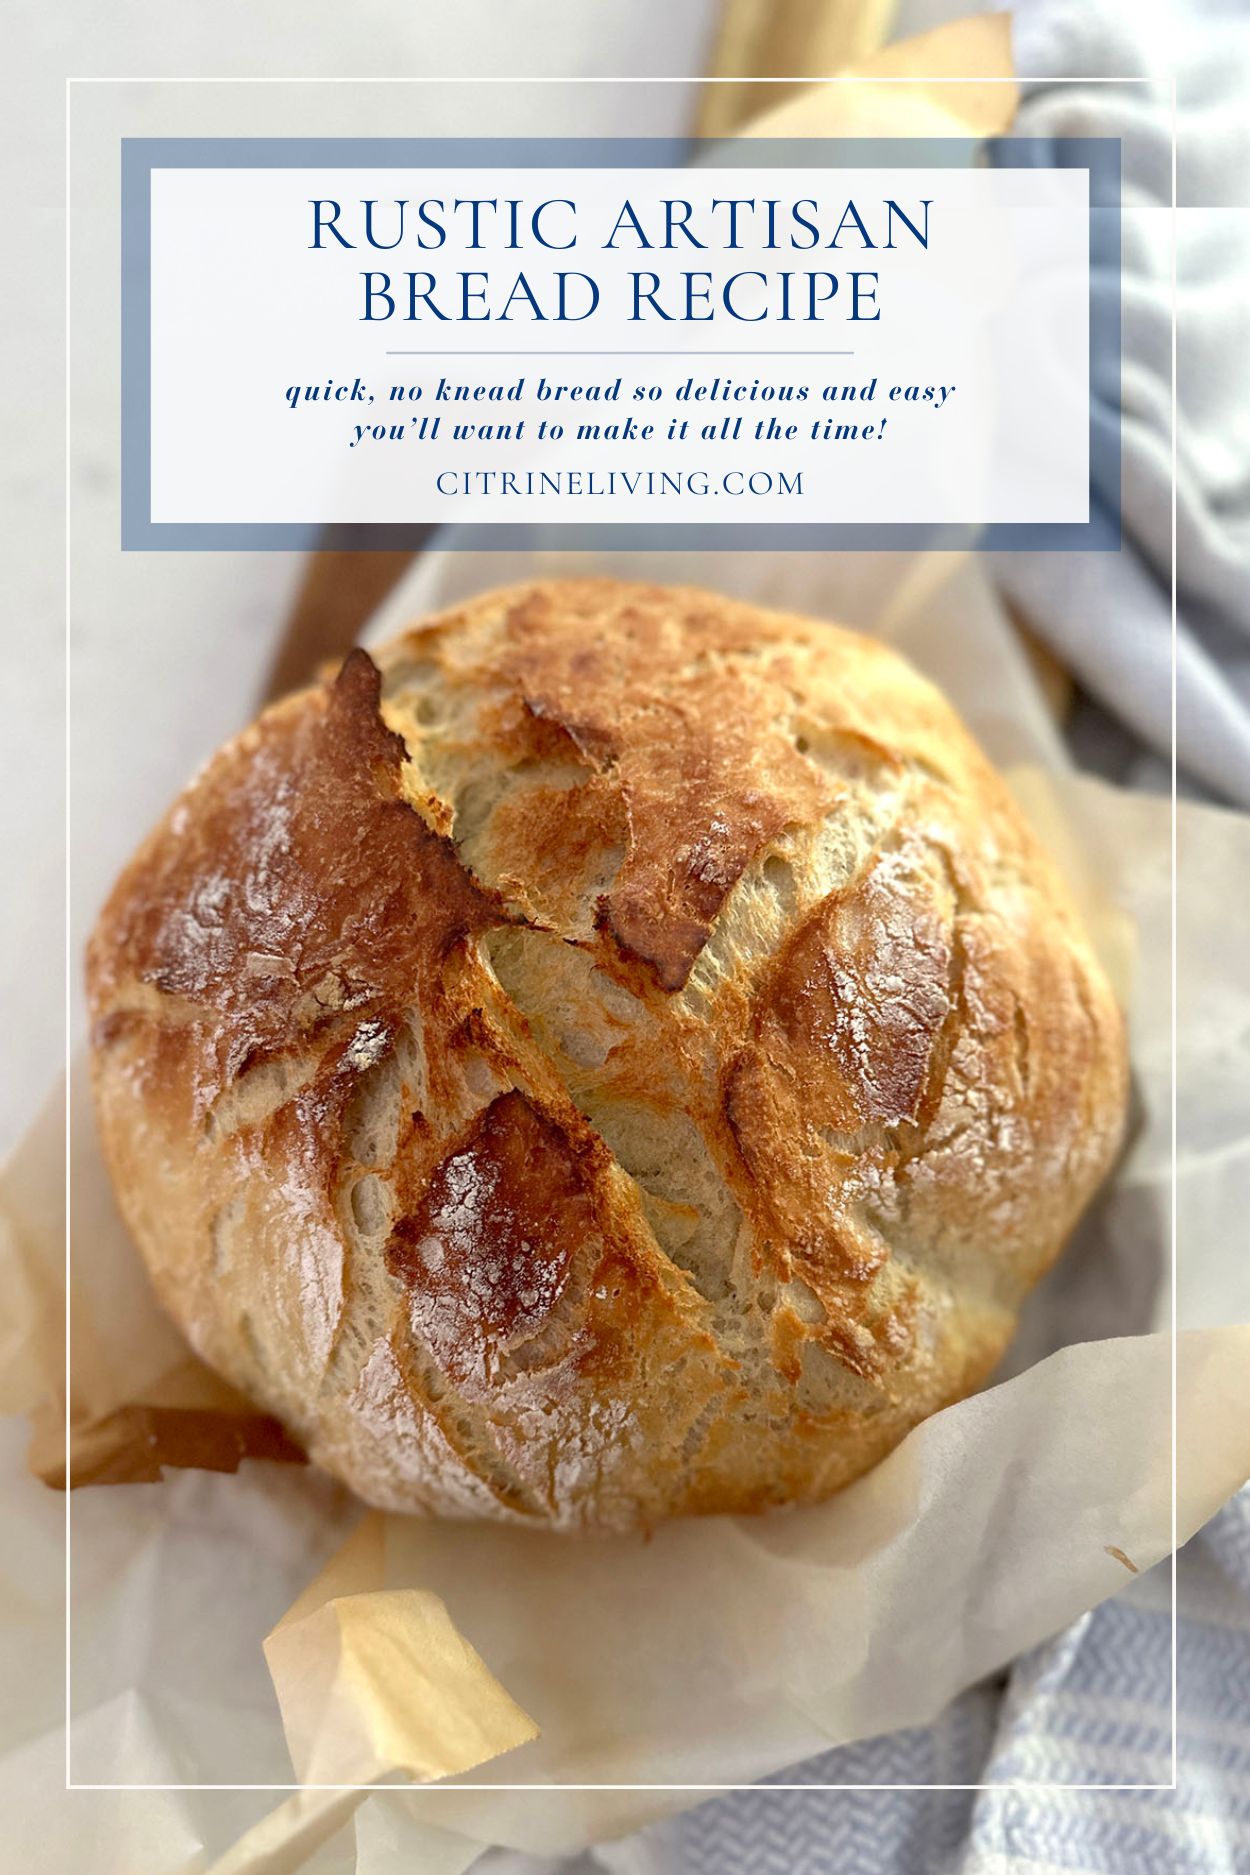
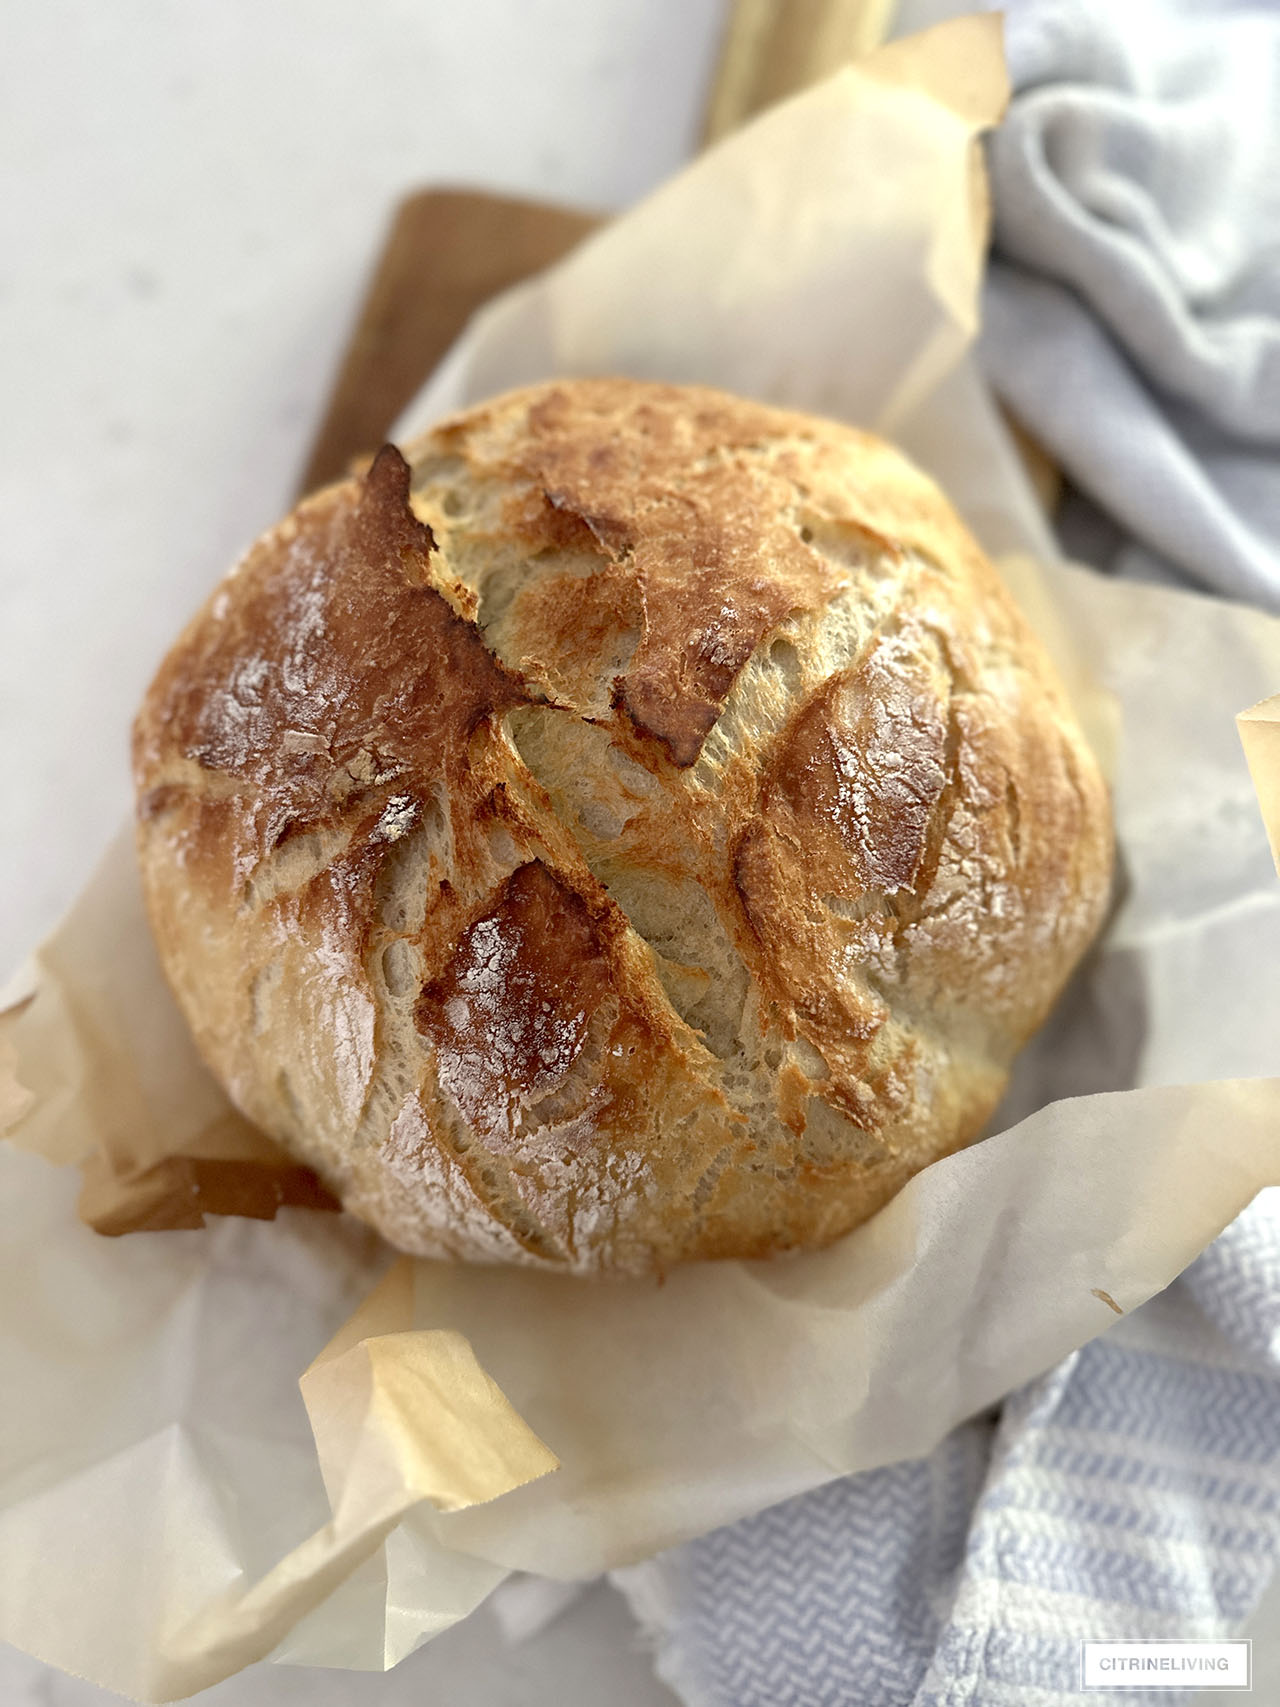
RUSTIC ARTISAN BREAD: NO KNEAD AND SO EASY TO MAKE!
Delicious, homemade rustic artisan bread that is SO EASY to make, anyone can do it – you’ll have a beautiful, freshly baked loaf – and your home smelling scrumptious – in just a few short hours!
Have you ever wanted to make your own homemade bread? If you’re like me, having a freshly baked loaf of crusty on the outside, chewy on the inside, mouthwatering homemade bread in the kitchen is pure happiness. I love to bake and in the past year or so, I’ve been experimenting with many different, simple homemade bread recipes. Through trial and error, I’ve come up with this incredibly delicious, rustic artisan bread recipe that will become a staple in your baking arsenal from now on, I promise. You will not believe how simple it is to make, how quickly you can have your home filled with that irresistible, freshly baked bread aroma. Everyone will be asking when the bread will be ready! The best part is, all you need are basic ingredients and a few hours and you will have your very own rustic artisan bread right in your own kitchen. Trust me, if you love homemade bread but don’t have a lot of time to make it, or you’ve never made bread before, this rustic artisan bread recipe is for you. It’s that simple to make, anyone can do it!
JUMP TO RECIPEAffiliate links are provided throughout this post – see my full disclosure policy here. As an Amazon Associate I earn from qualifying purchases.
There is really nothing quite like the smell of delicious, homemade fresh bread baking in the oven. It’s such a comforting feeling when that aroma fills our home. Our family loves it when they see me assembling the ingredients for my dough, because they know exactly what is about to happen in the next few hours.
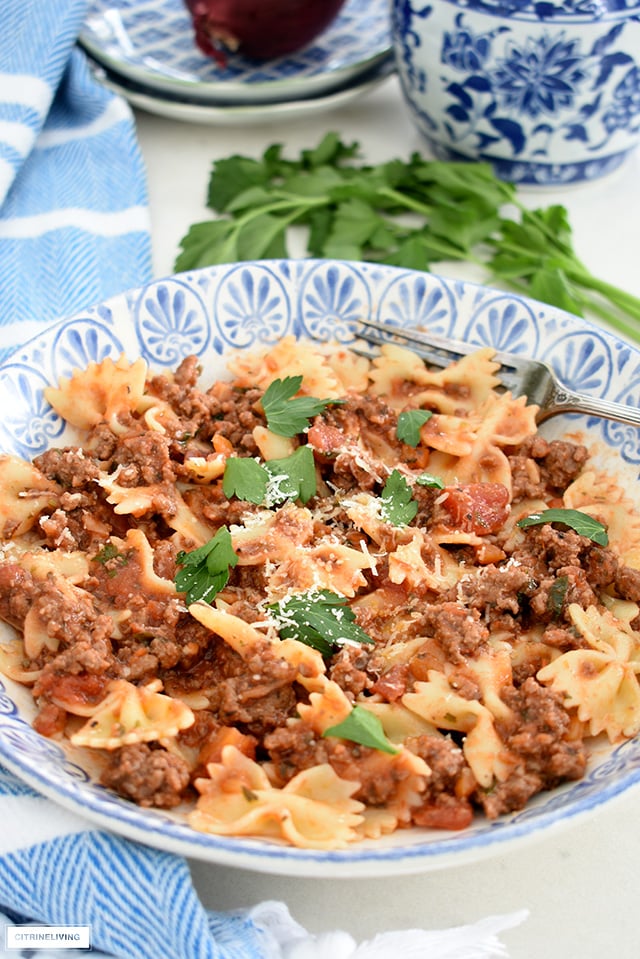
Warm, crusty bread is so delicious, slathered in soft, salted butter – I also love it topped with some raspberry jam on there too…so yummy! Dip it into olive oil and balsamic vinegar, or into any stew or soup – our cream of vegetable soup, makes the perfect pairing. It’s delicious with our pasta bolognese – comfort food at it’s finest.

WHAT IS RUSTIC ARTISAN BREAD?
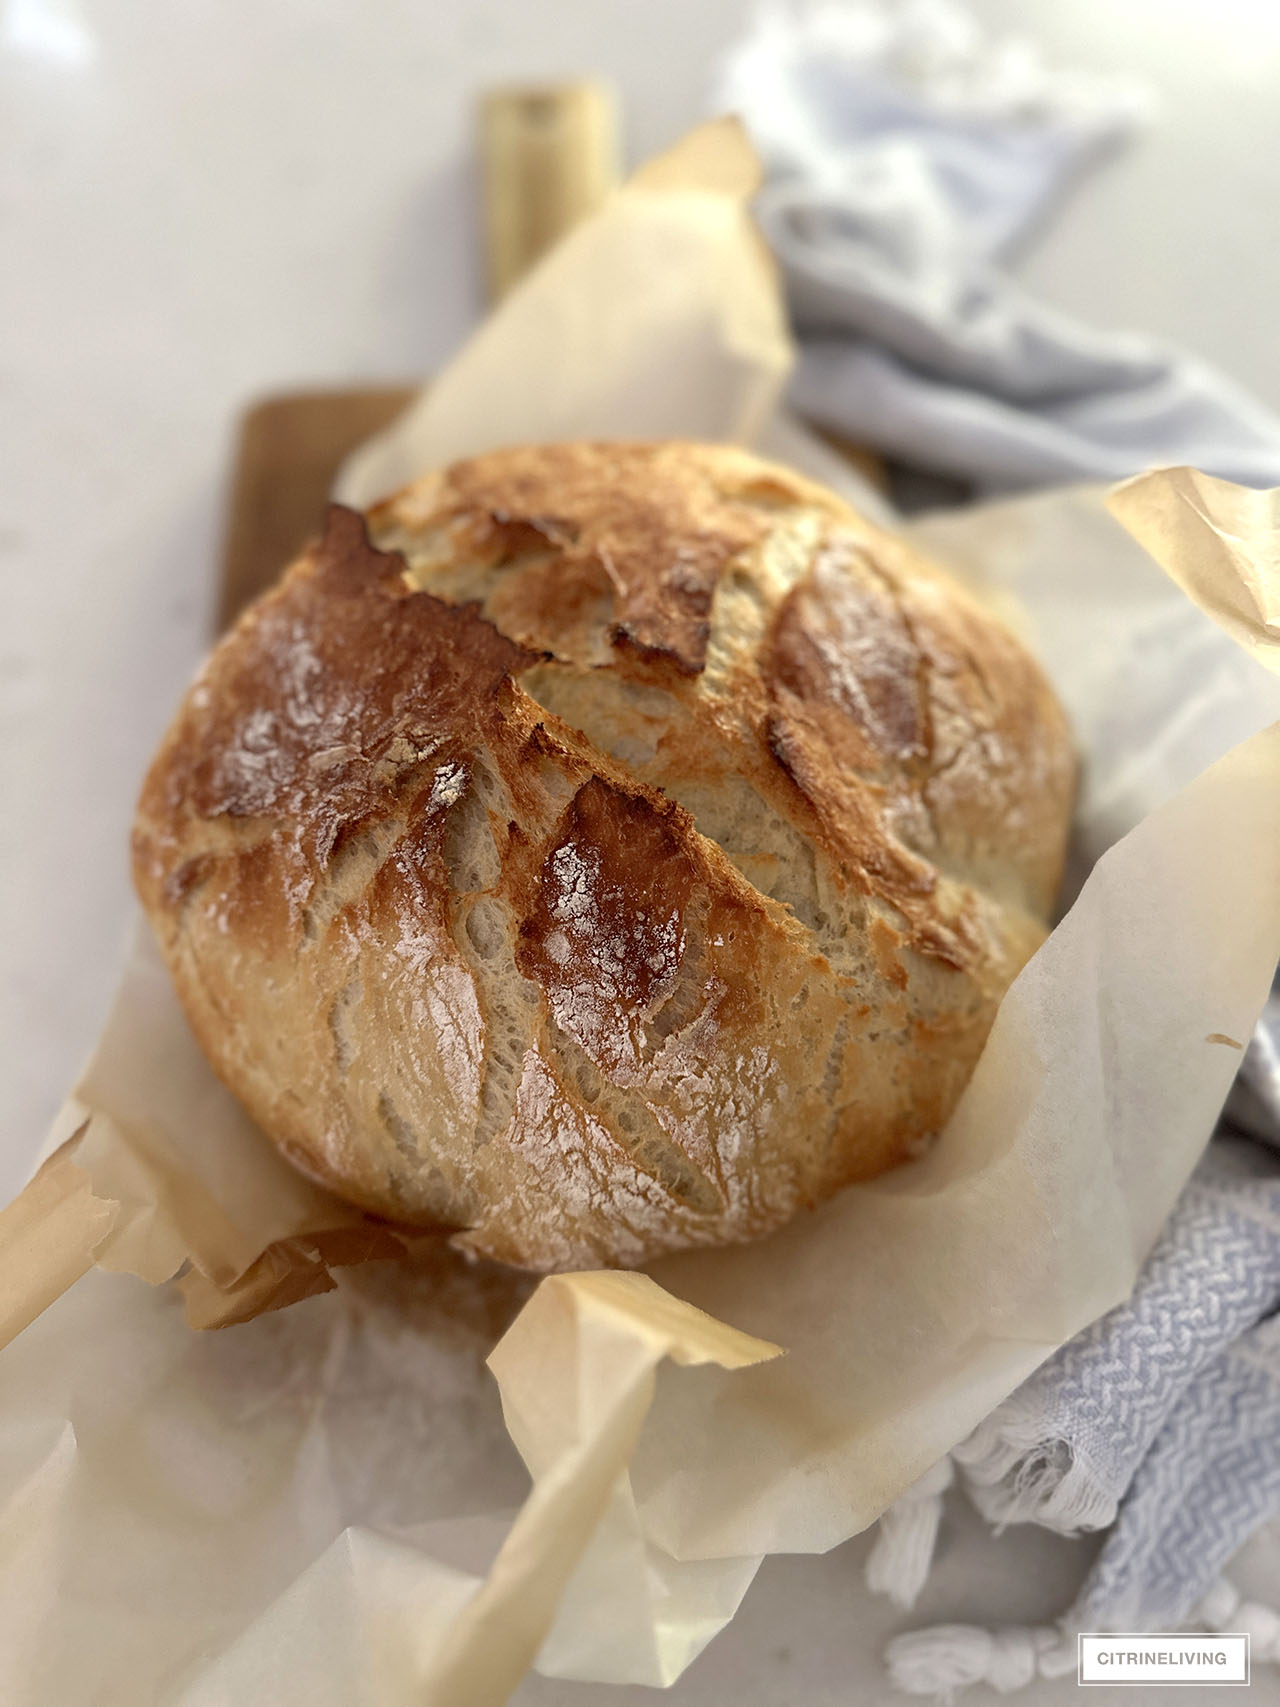
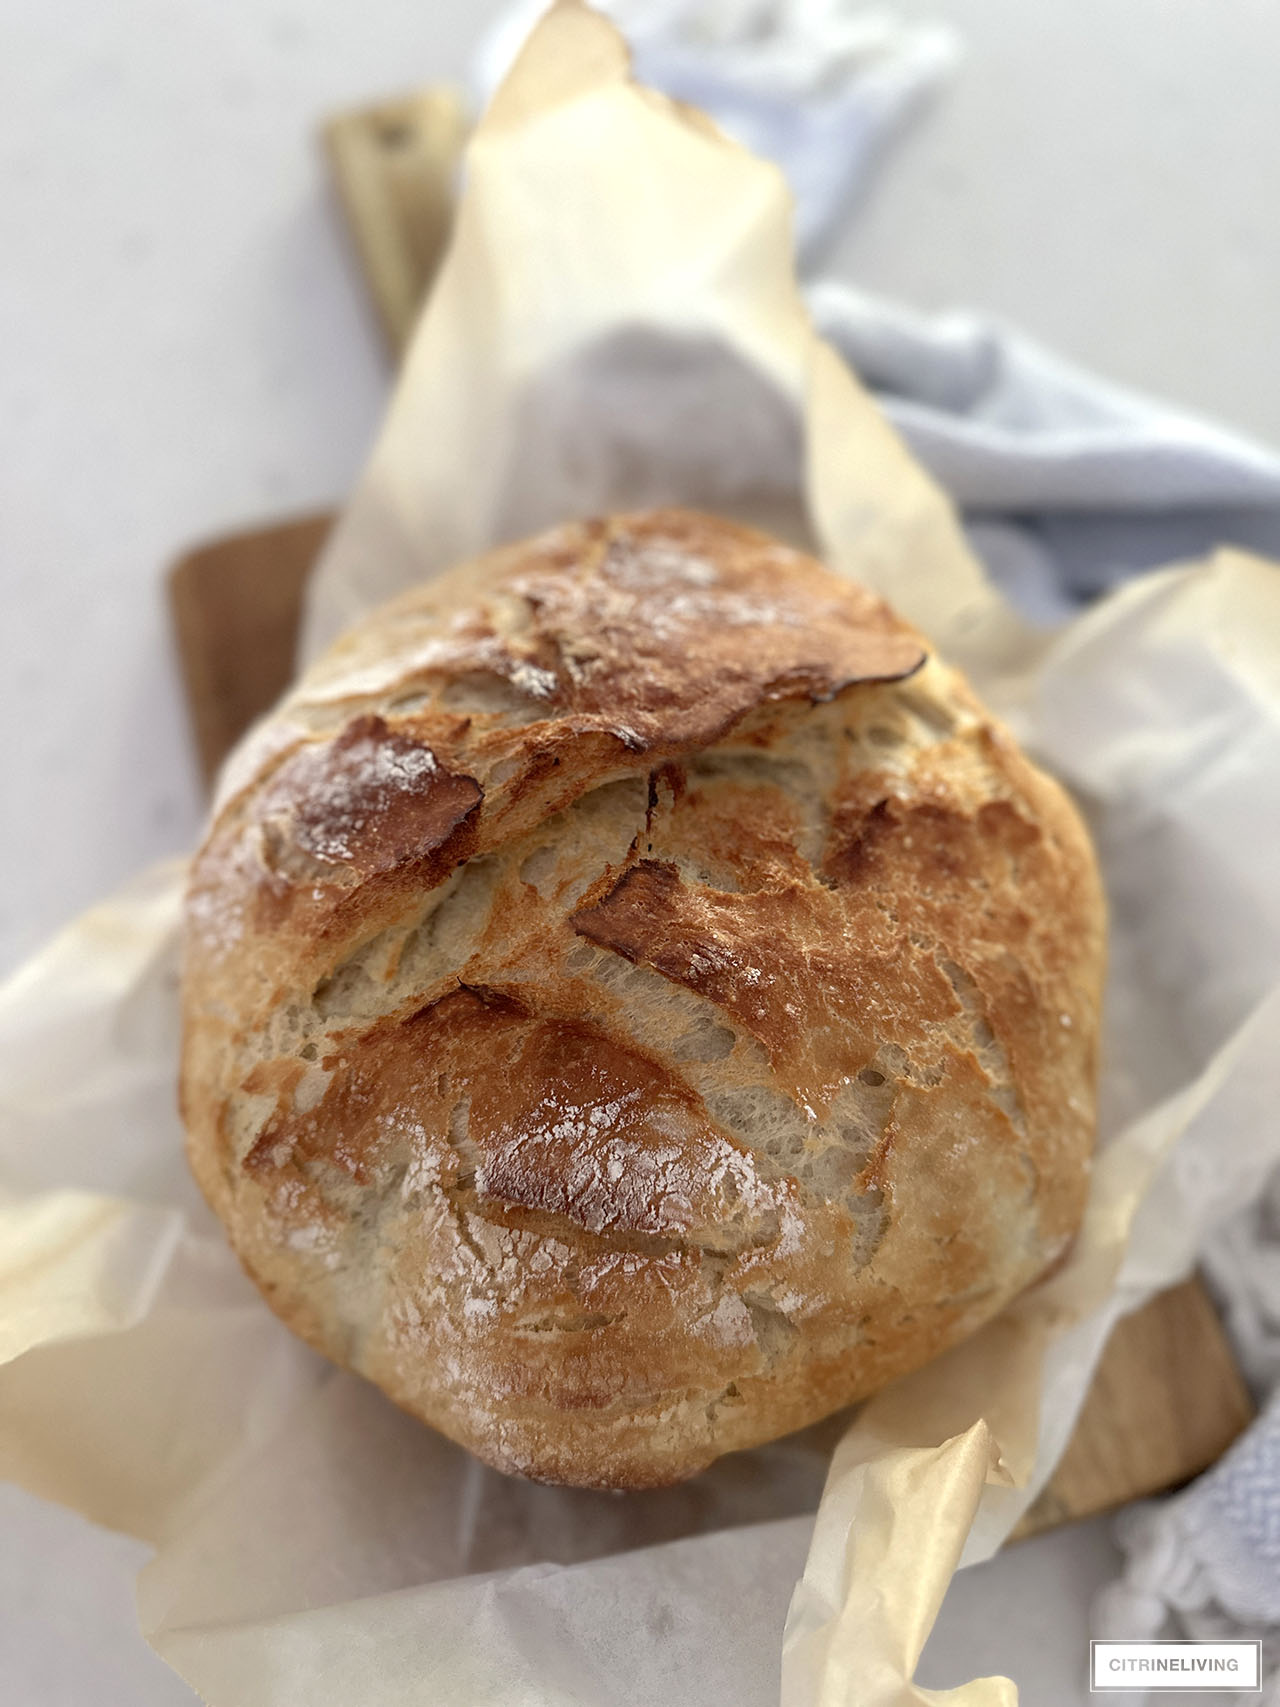
Think homemade, simple, all natural. This is what comes to mind for me when I think of rustic artisan bread. Slightly crusty on the outside, chewy on the inside and rustic, even imperfect in shape – a beautiful handmade, fresh-baked creation that is thoughtfully and lovingly made!
WHAT KIND OF FLOUR DO YOU USE FOR RUSTIC HOMEMADE BREAD?
I’ve tried different types of flour for this recipe, all of which give delicious results and are somewhat similar for the most part. From bread flour, to all-purpose flour to Italian fine 00 flour (for pizza or focaccia), any one of these will give you scrumptious rustic artisan bread.
I do find when using all-purpose flour, you need more water, vs. the other flours, I would use less – trust me, I’ve used 2 cups of water with bread flour and it was a total disaster! If the dough feels too dry, you can add a little more water as you mix.
Bread flour and Italian flour have a higher protein content, which means it has more gluten, these will give you slightly chewier results. All purpose flour gives you absolutely delicious bread as well, I actually prefer the results. I use whichever one I have handy in my pantry, they all make scrumptious bread that you can’t stop eating.
PANTRY TIP
Homemade bread makes the perfect hostess gift! Bake it in the morning and wrap it in a beautiful tea towel for your host or hostess – you’ll be their favorite guest!
DO YOU NEED A DUTCH OVEN TO MAKE ARTISAN BREAD?
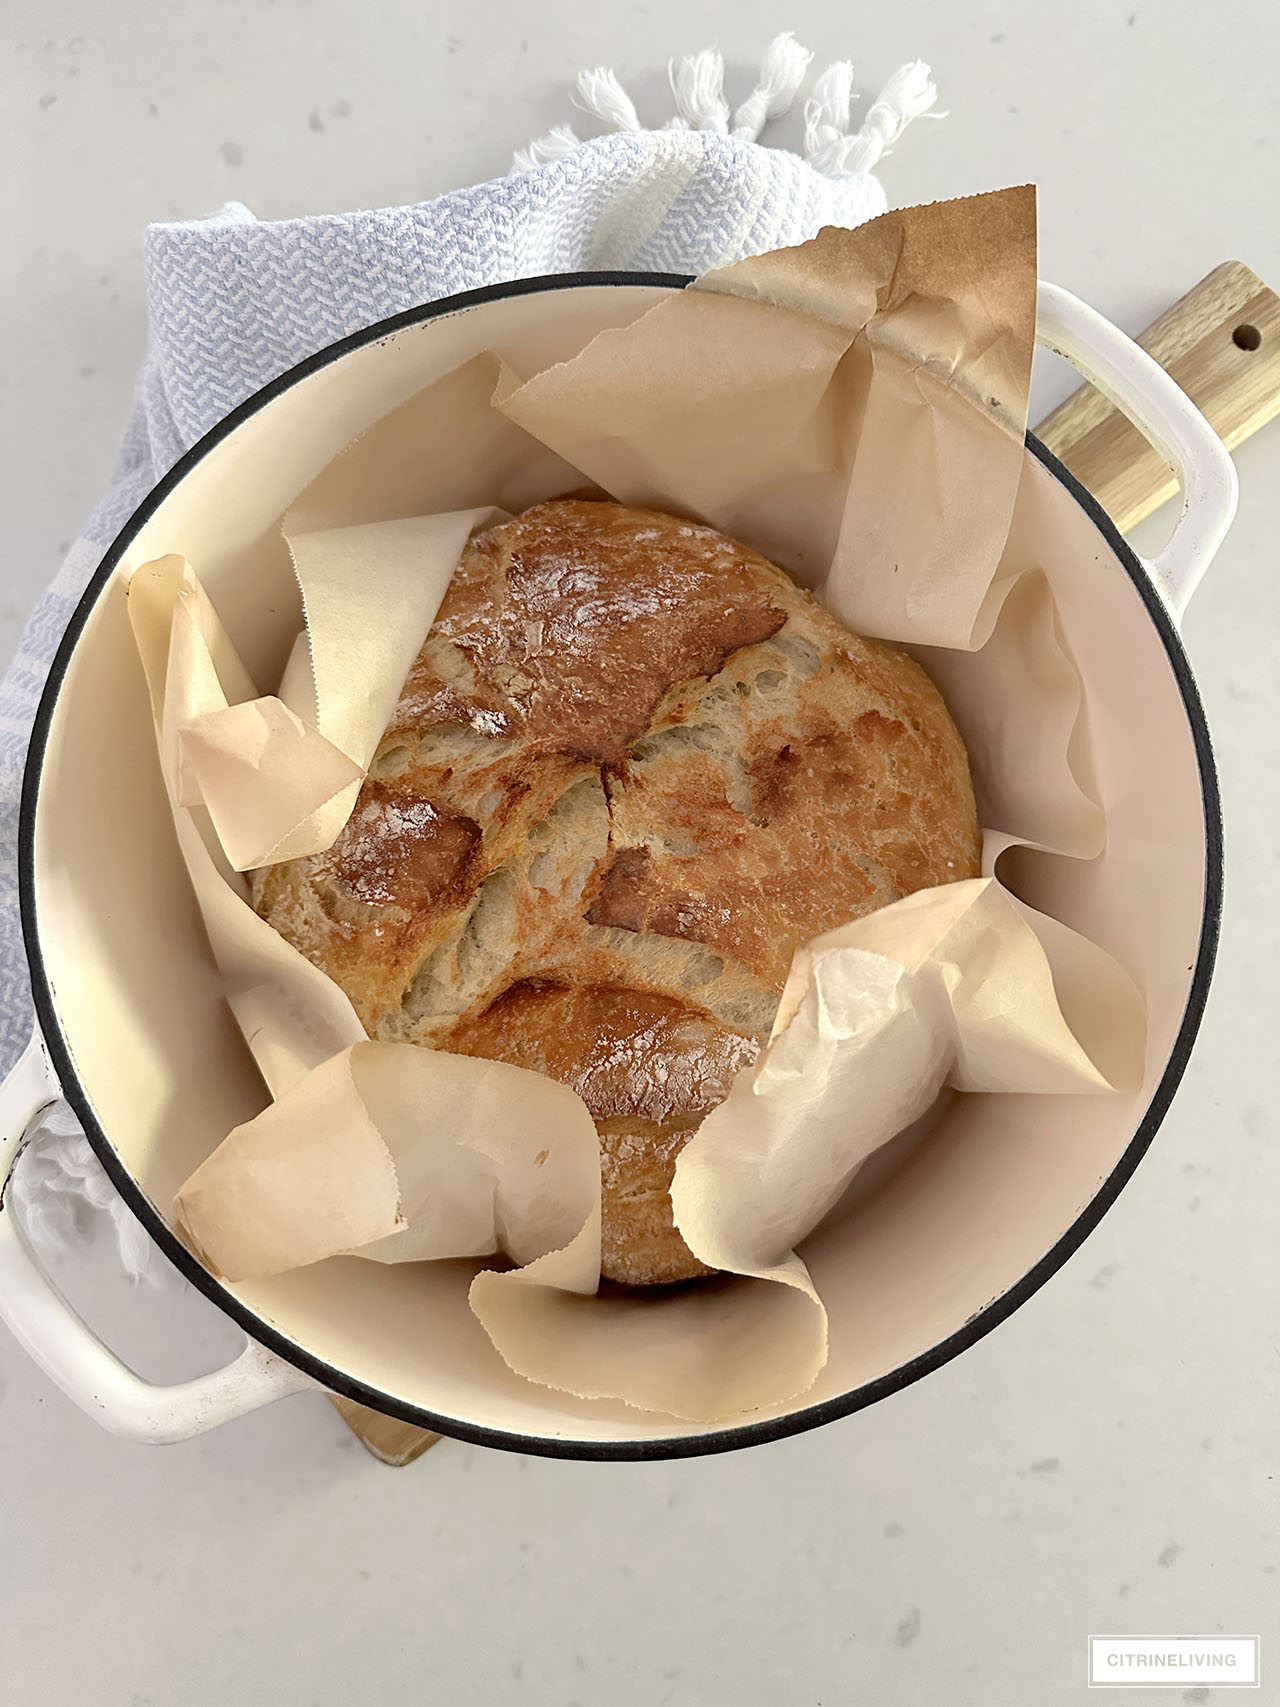
A dutch oven is used to bake this rustic artisan bread, as it helps to create steam inside the pot. This keeps the temperature very hot inside the dutch oven to help the dough rise and it gives you that crispy crust and perfect crumb texture inside.
If you don’t have a dutch oven, you can simply use a baking sheet for your bread, and a baking dish filled with water on the rack underneath to create steam in the oven as your bread is baking. I personally haven’t tried this method, but it is very commonly used and is supposed to yield excellent results.
WHAT DOES OLIVE OIL ADD TO BREAD DOUGH?
The addition of olive oil in your bread dough helps to give this rustic artisan bread a deliciously soft, chewy crumb texture and is so delicious.
I’ve seen many recipes without oil – which you can leave out of this recipe if you like – but I find it adds to the overall flavor and texture of the loaf. The added oil on top of the dough in this recipe is totally optional – you can leave it out if you want an extra crunchy crust!
WHAT DO YOU DO WITH LEFTOVER BREAD?
I like to keep any leftover bread on a covered cake plate. It usually keeps it pretty well for a few days – if it even lasts that long!
If you don’t finish your loaf the day you make it, this rustic artisan bread is perfect the next day or two, to use for grilled cheese (or any grilled sandwich), or you can cut it up and dip it into our savory cheese fondue.
Use it for breakfast – make toast with your favorite topping, or grilled in a pan to french toast perfection. Try it with french onion soup, or cut it up and make your own homemade croutons. The possibilities are endless!
HOW TO MAKE RUSTIC ARTISAN BREAD
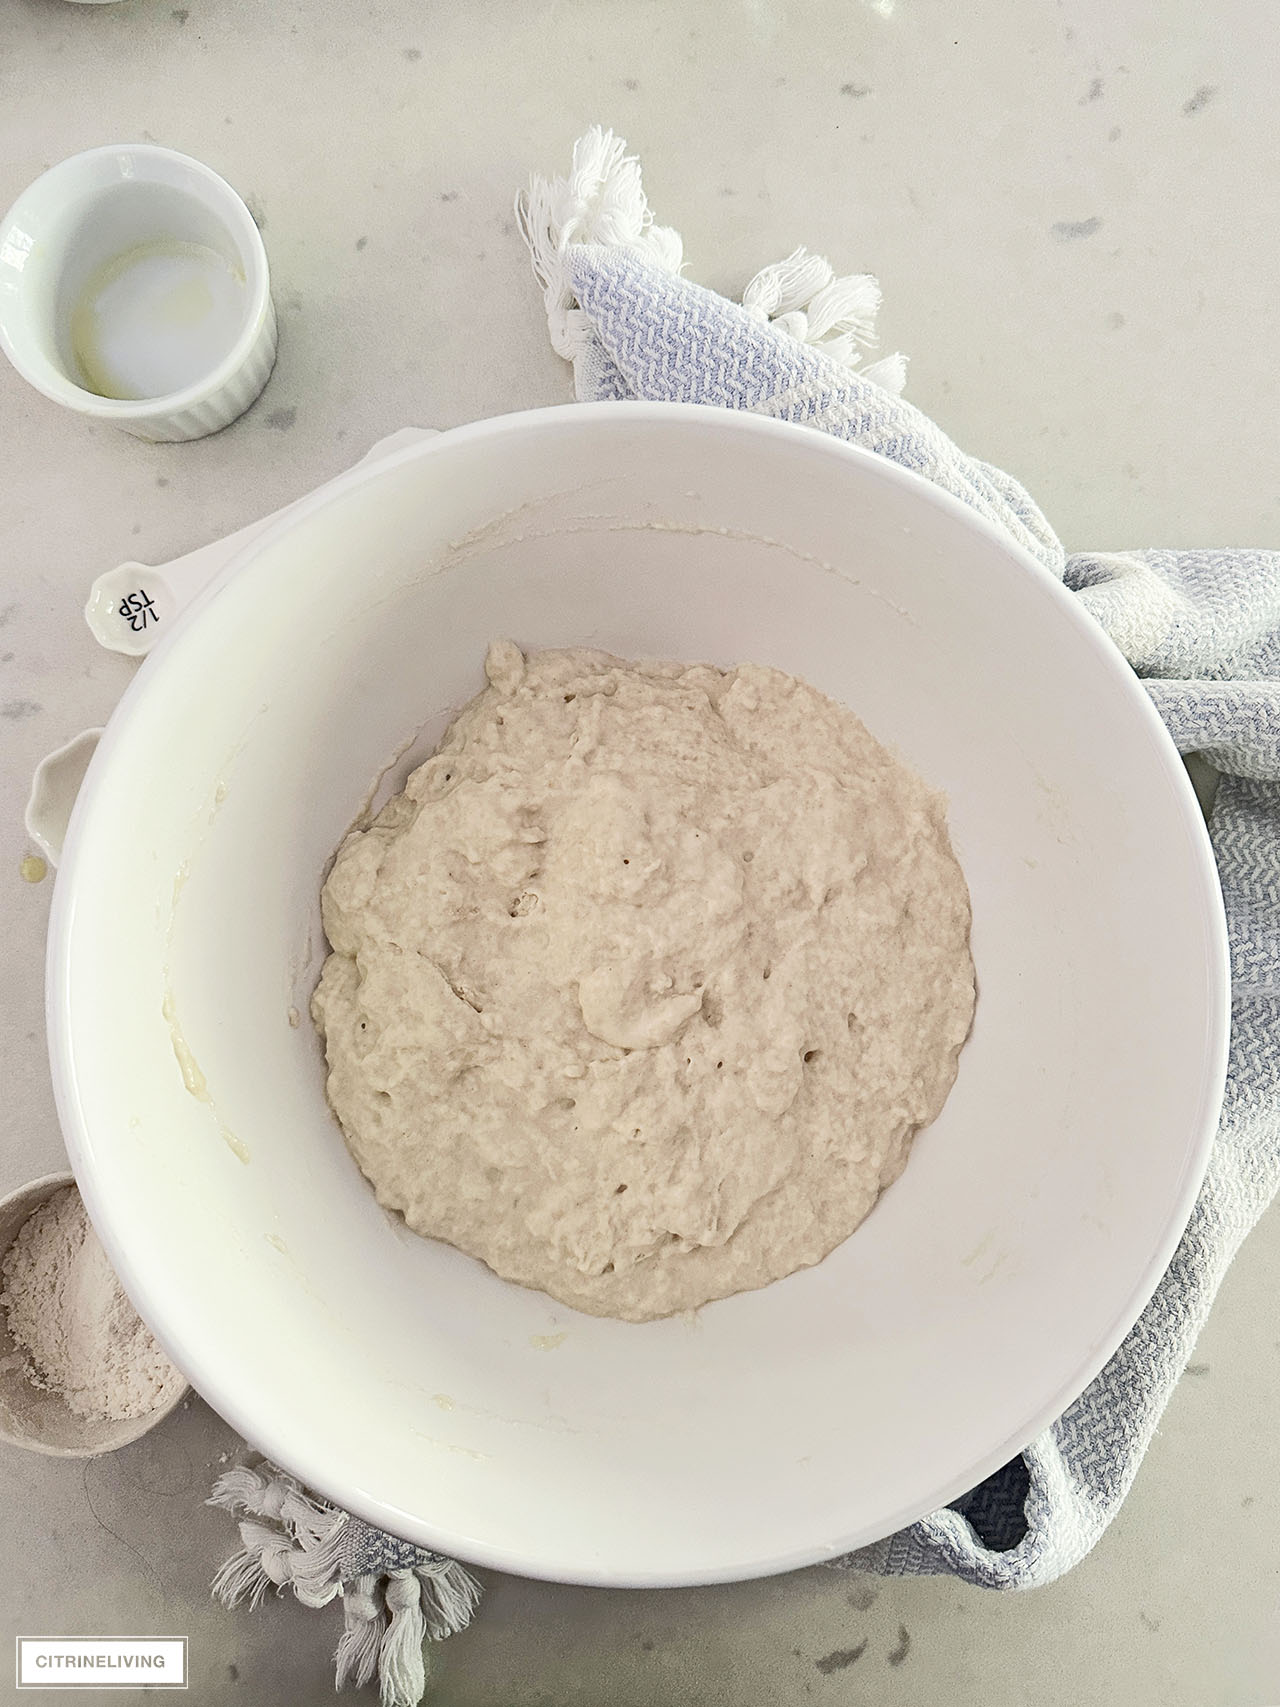
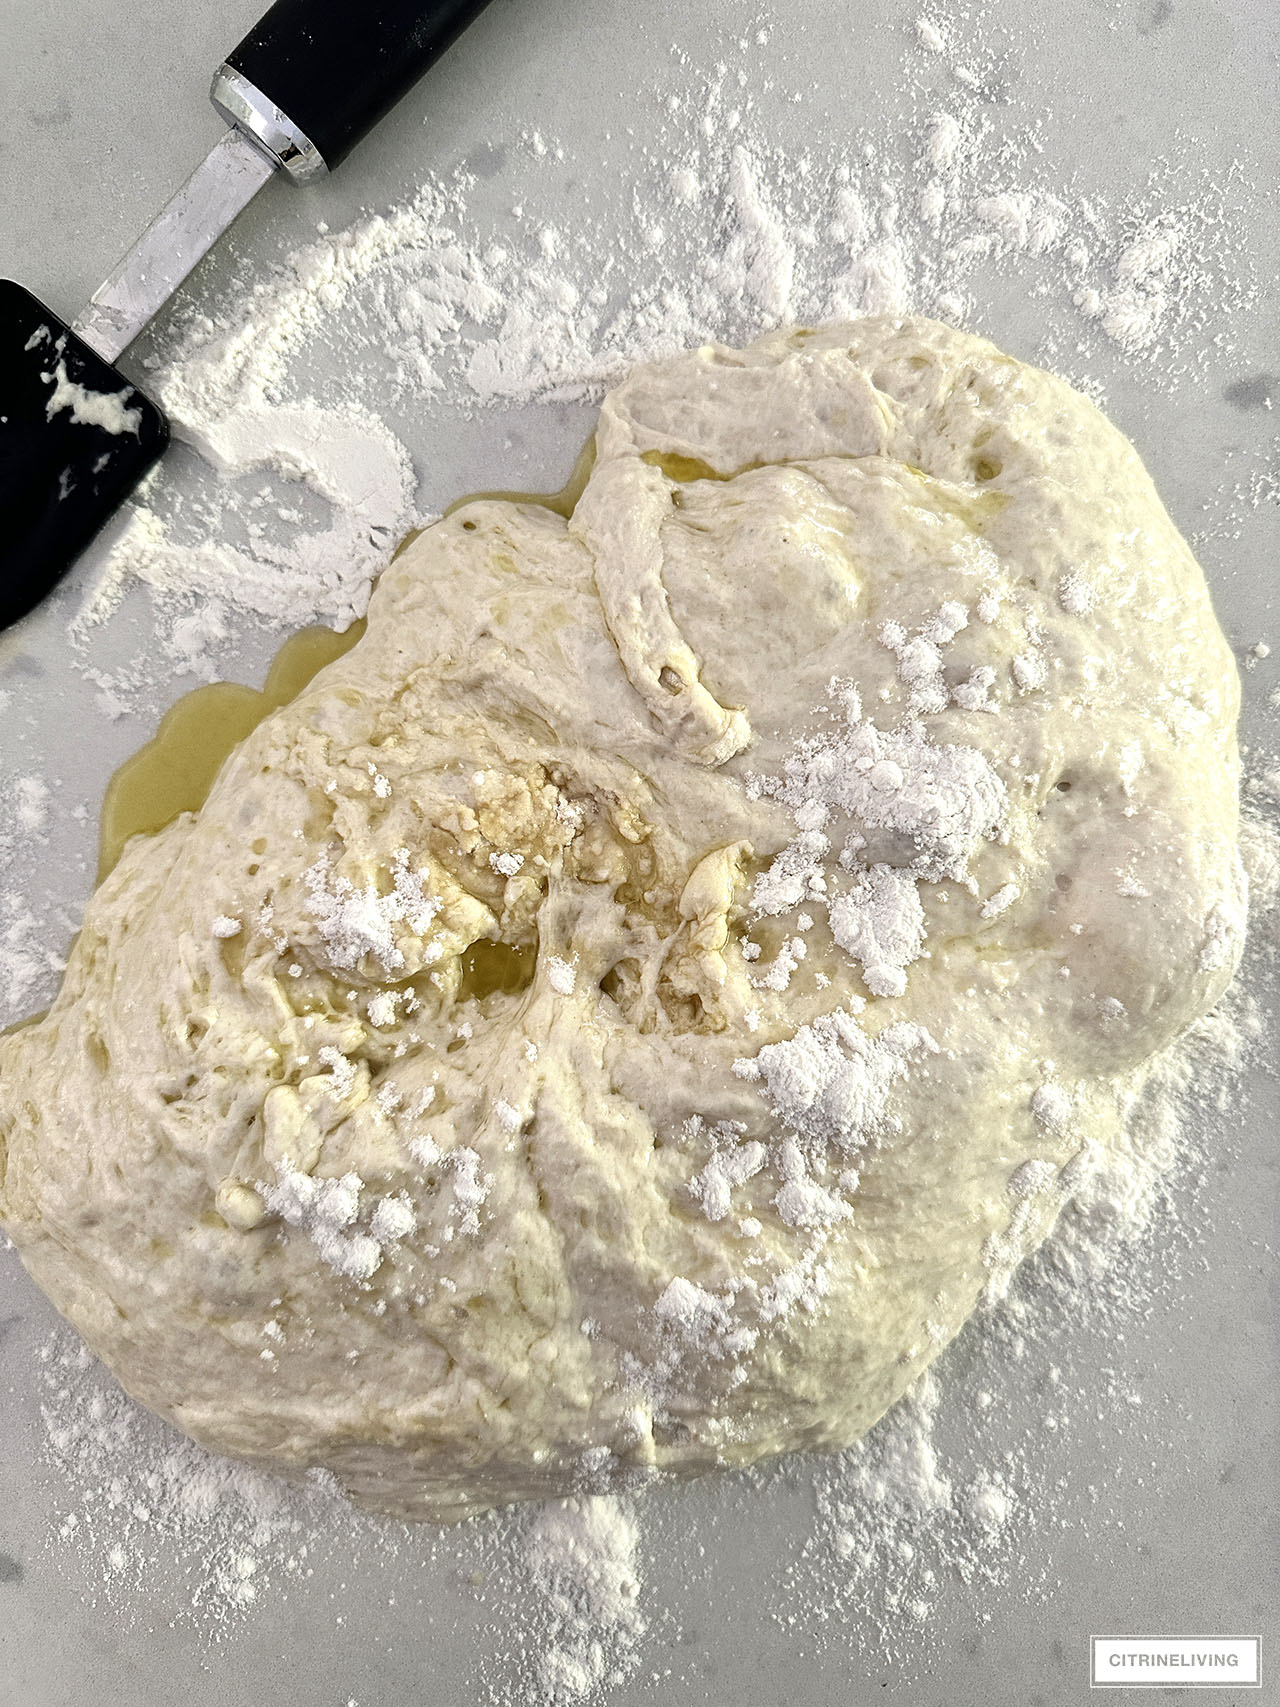
- Mix dry ingredients together in a large bowl. Add the warm water and 1 tablespoon of olive oil. Mix everything well with a silicone spatula, scraping the sides of the bowl – your dough will be shaggy (this means sticky). **IMPORTANT**As I mentioned above, if you’re using all-purpose flour, I find more water is needed. With bread or Italian flour, you need less water. Whichever one you do use, start with 1.5 cups of water and adjust as you mix, working up to 2 cups if needed.
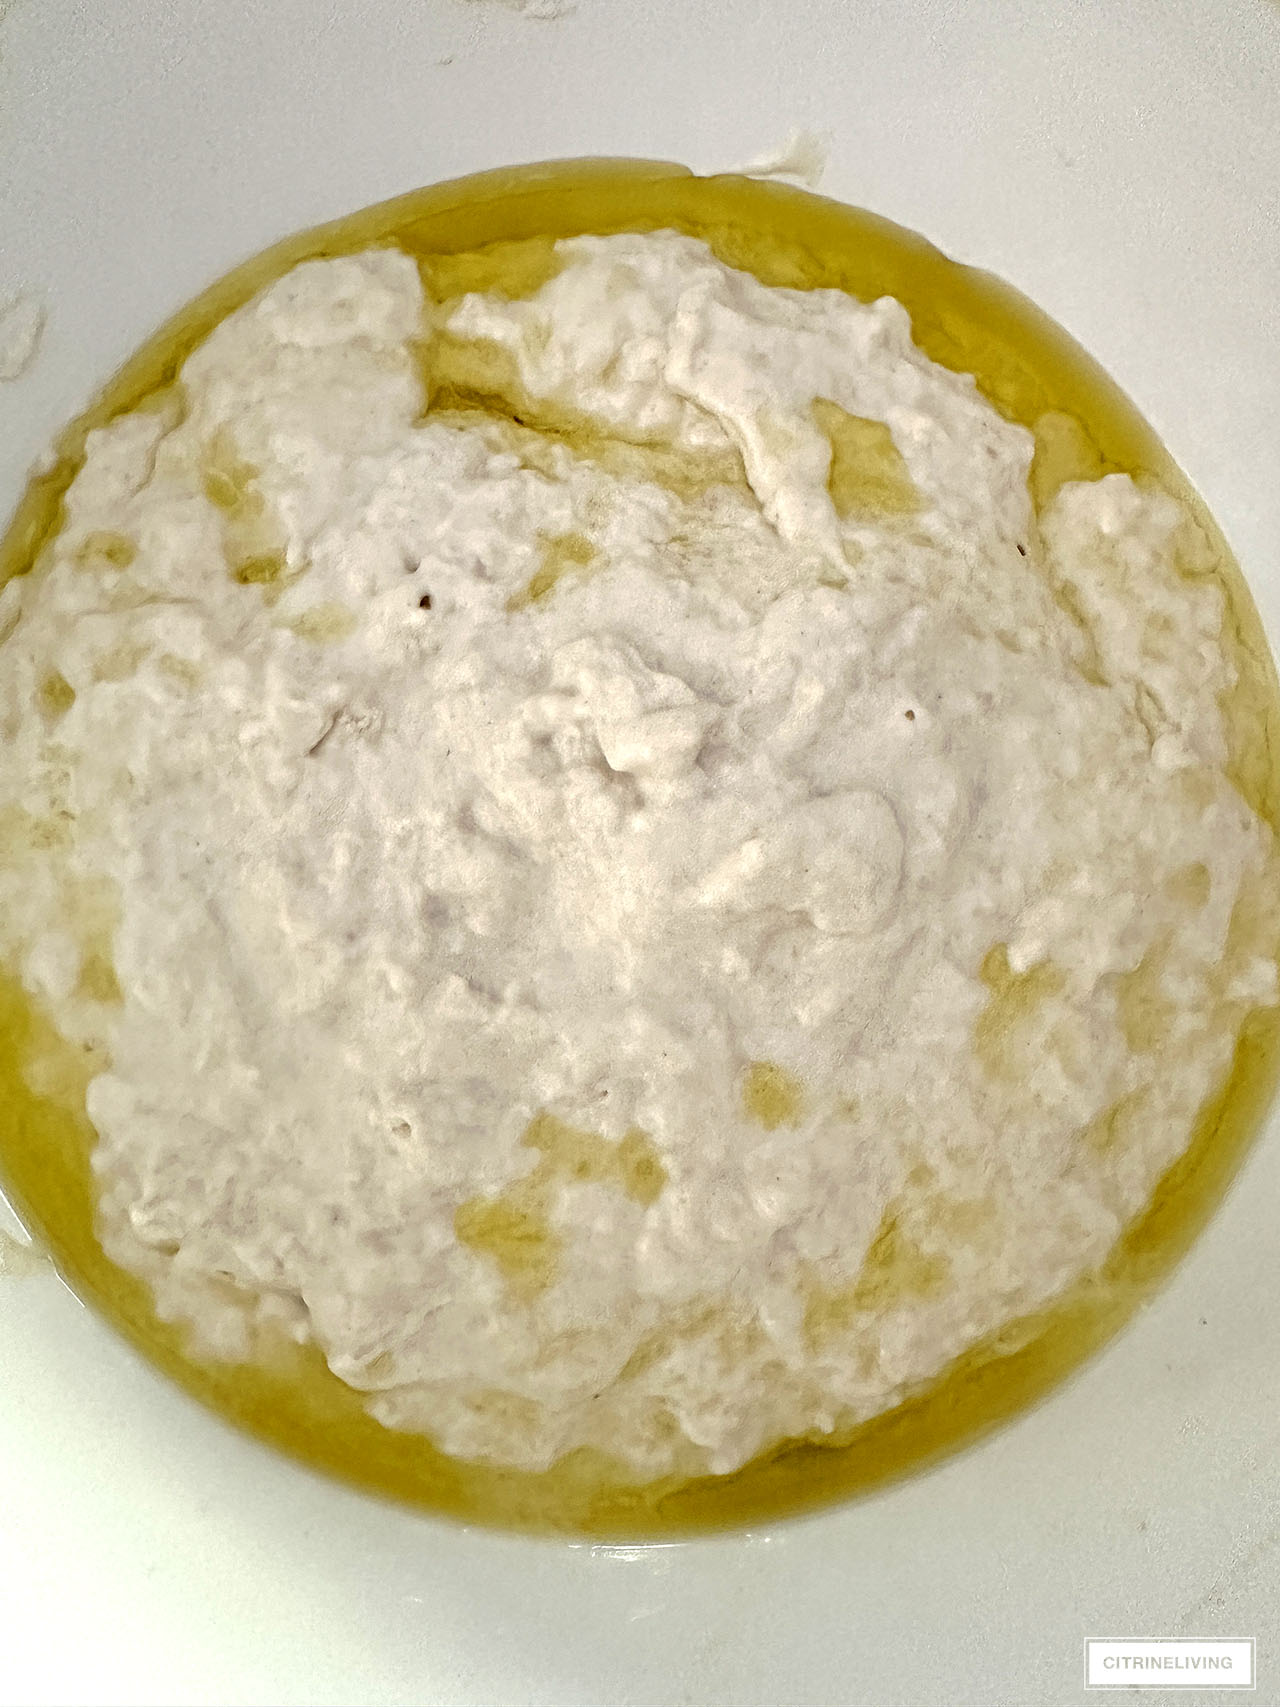
- Drizzle the remaining olive oil over the dough (this is optional) – my image below has slightly more, I don’t actually measure when I make it.
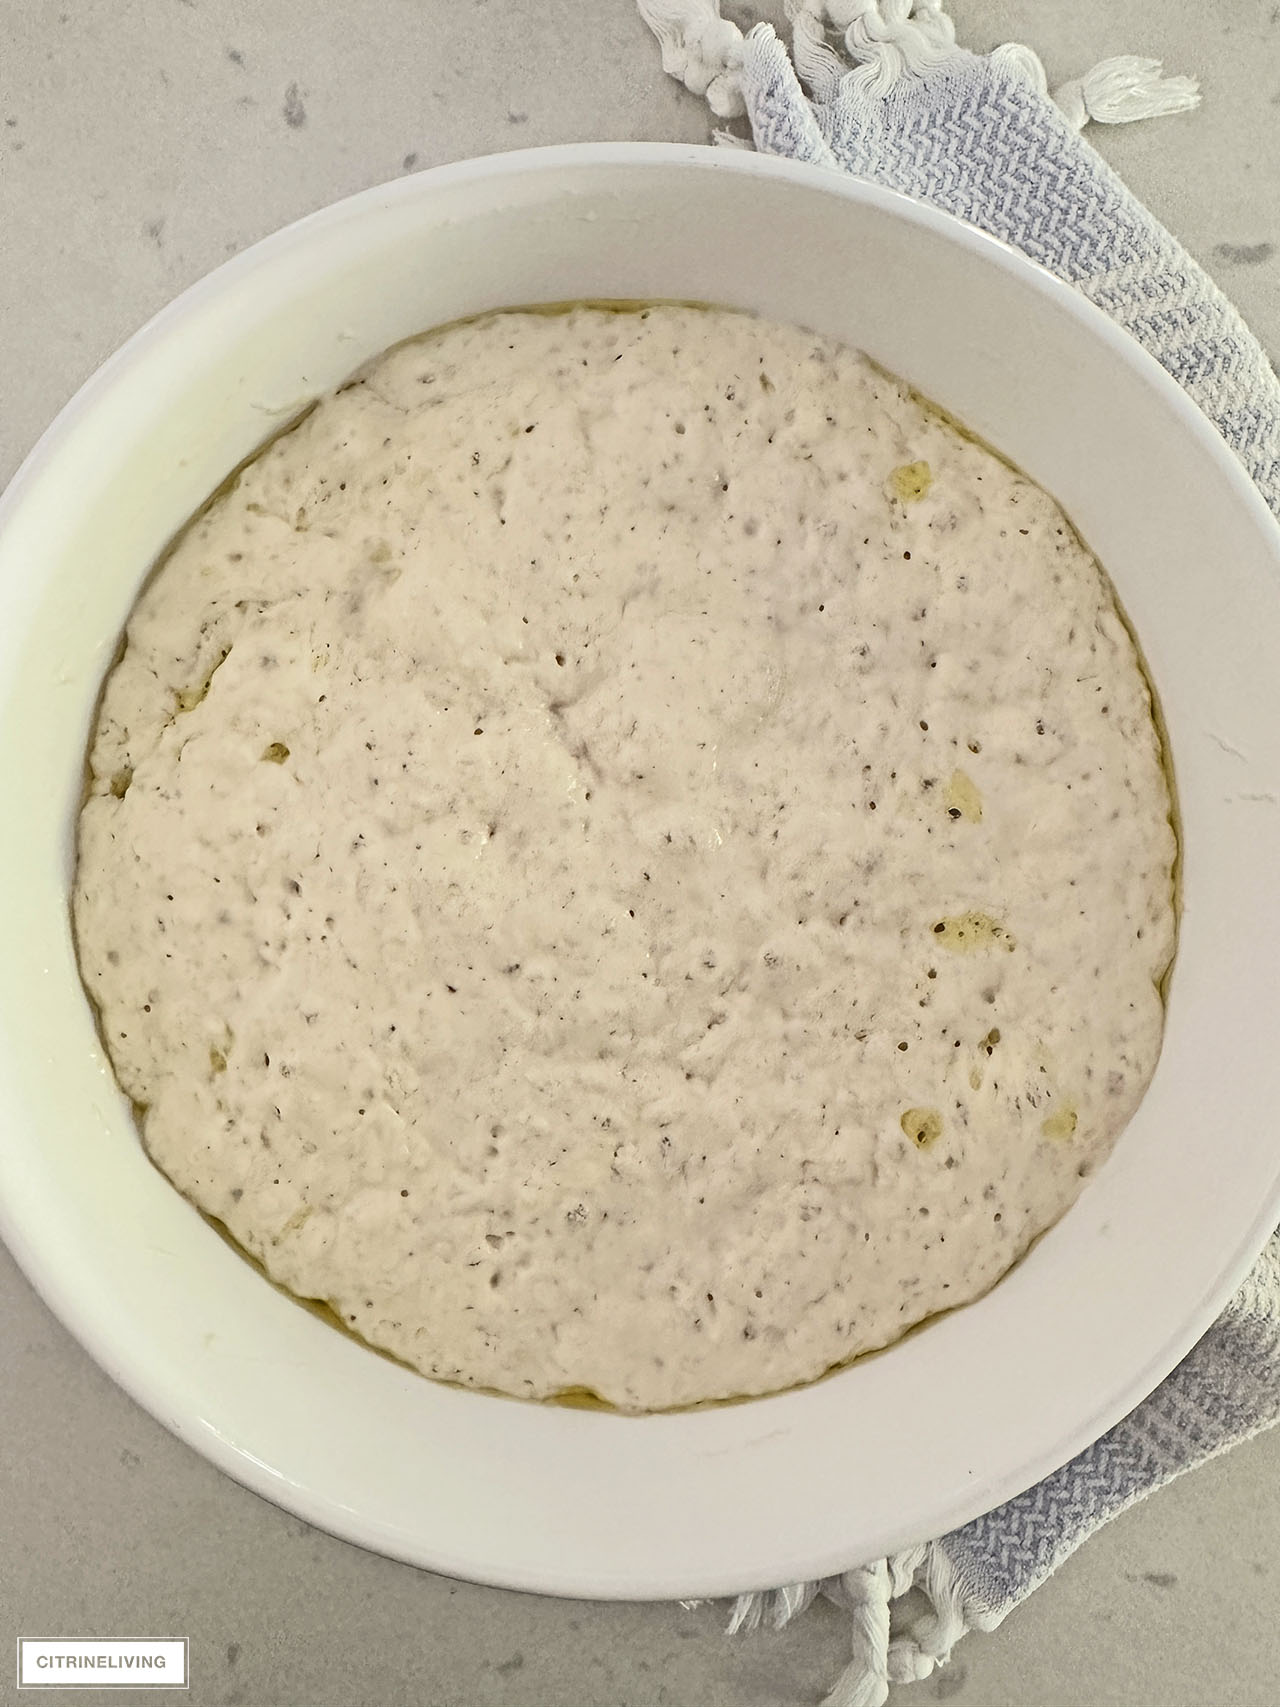
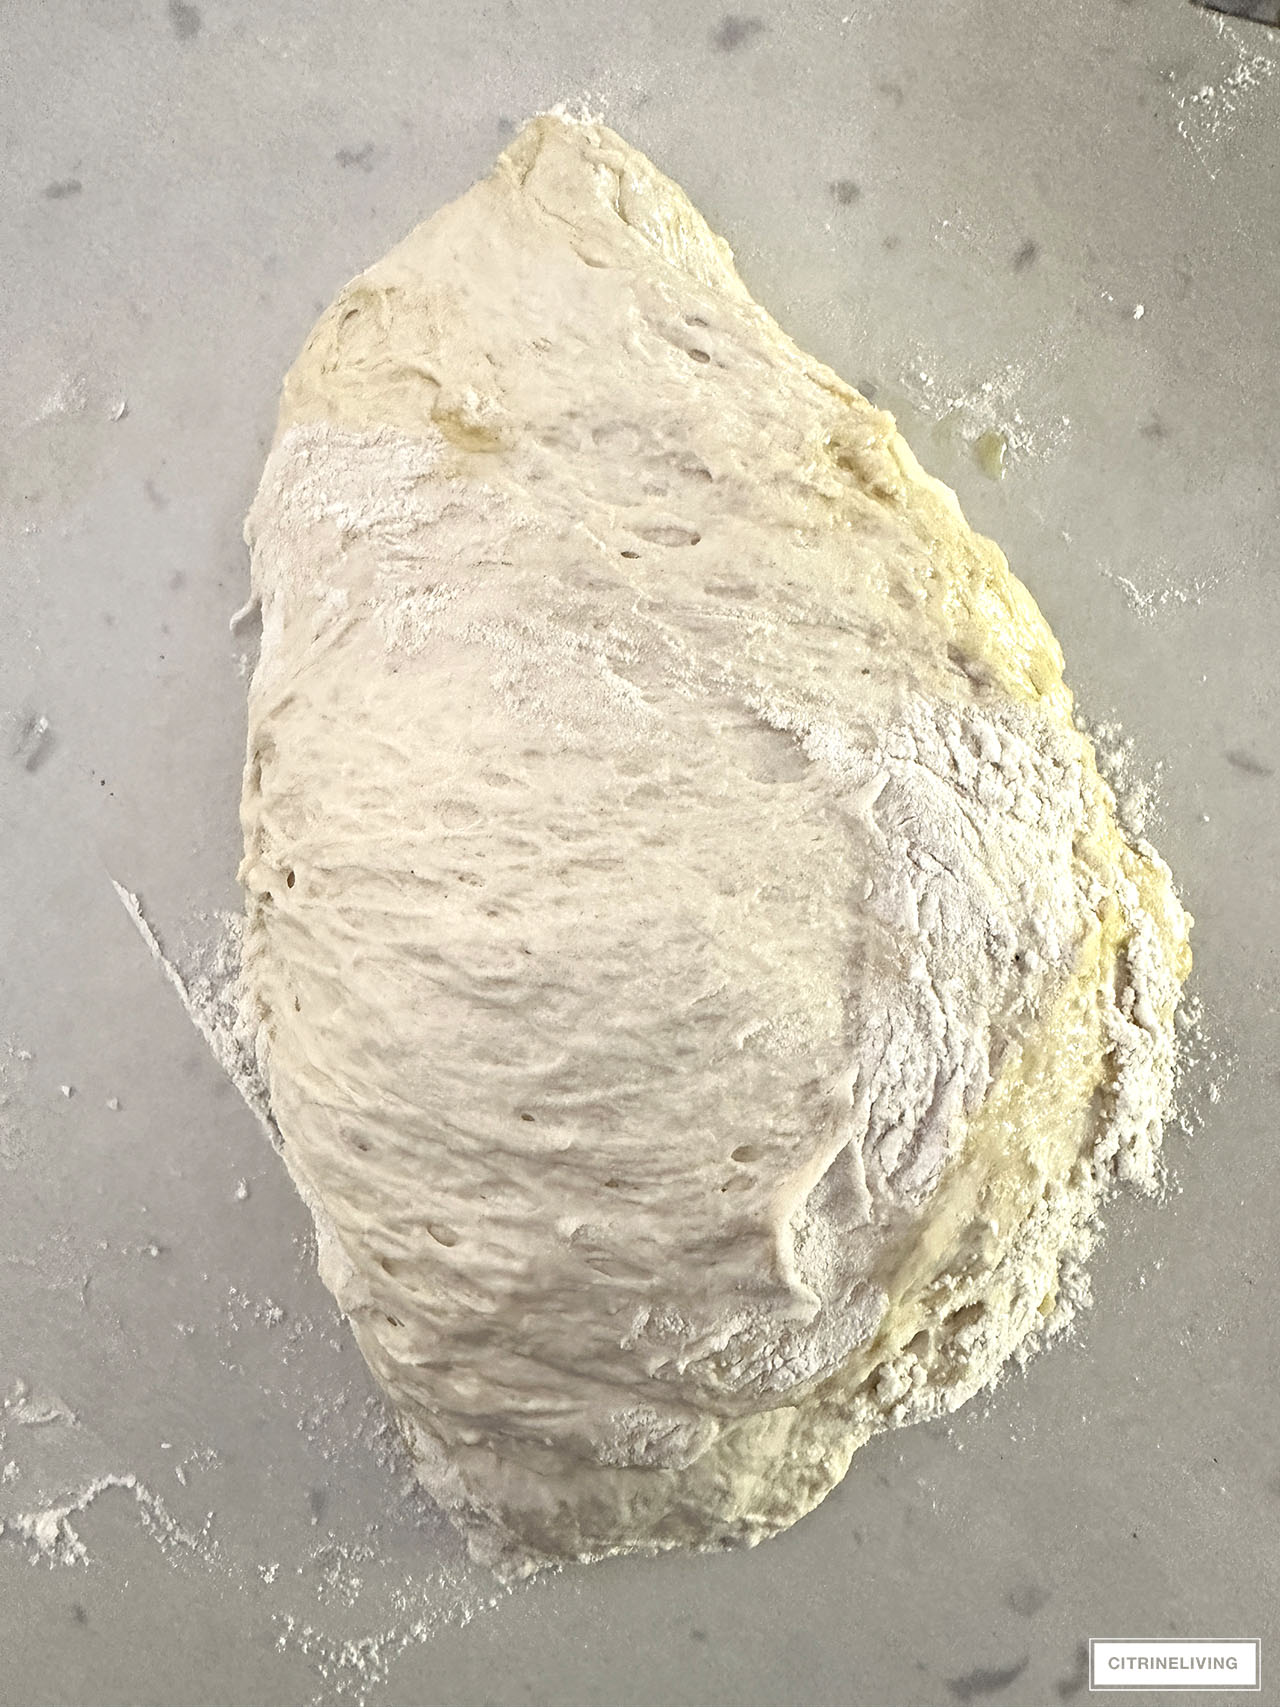
- Cover with plastic wrap and a tea towel. Let rise in a warm spot. I like to use the oven with the light turned on. After about 2 hours, when the dough has doubled in size (it will have lots of holes in it), remove the plastic wrap, it’s ready!
- Place the dutch oven in the oven and turn on to 450 degrees.
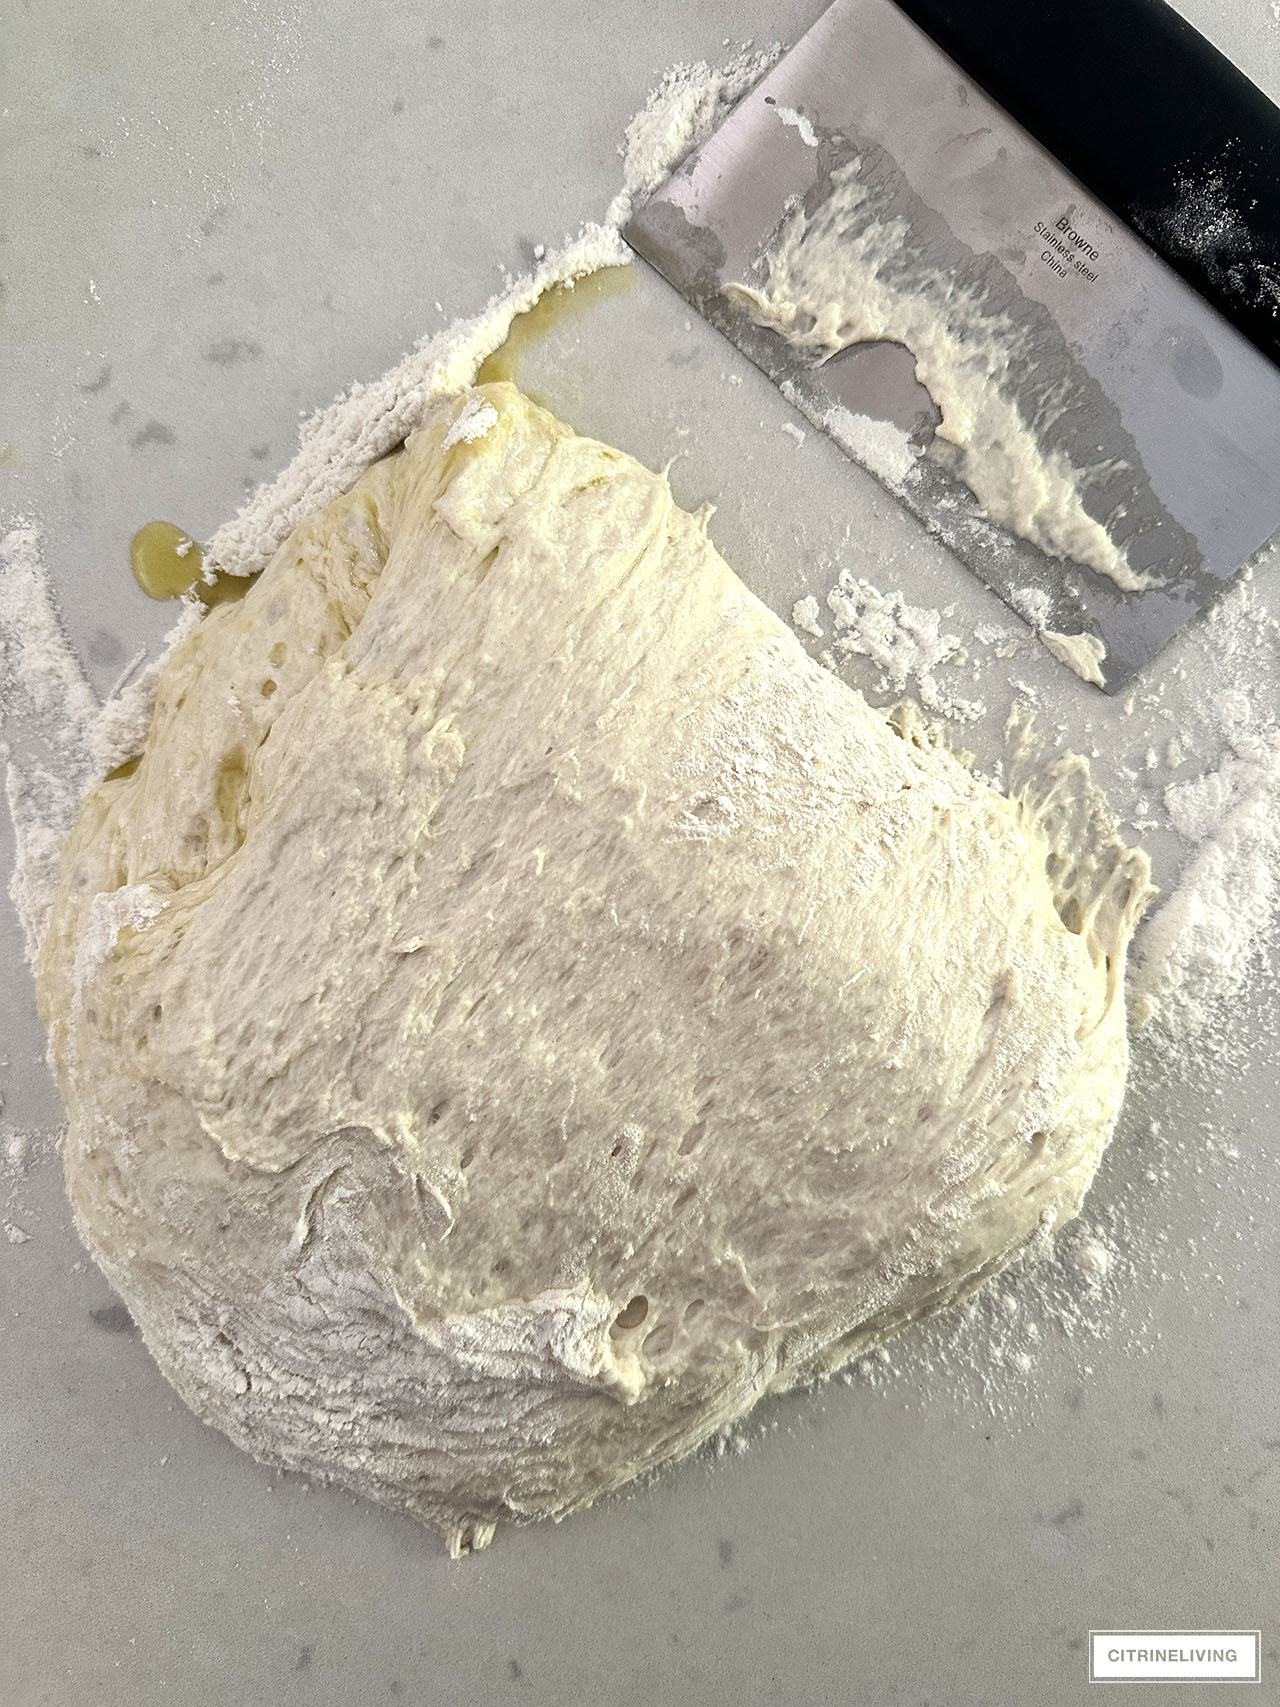
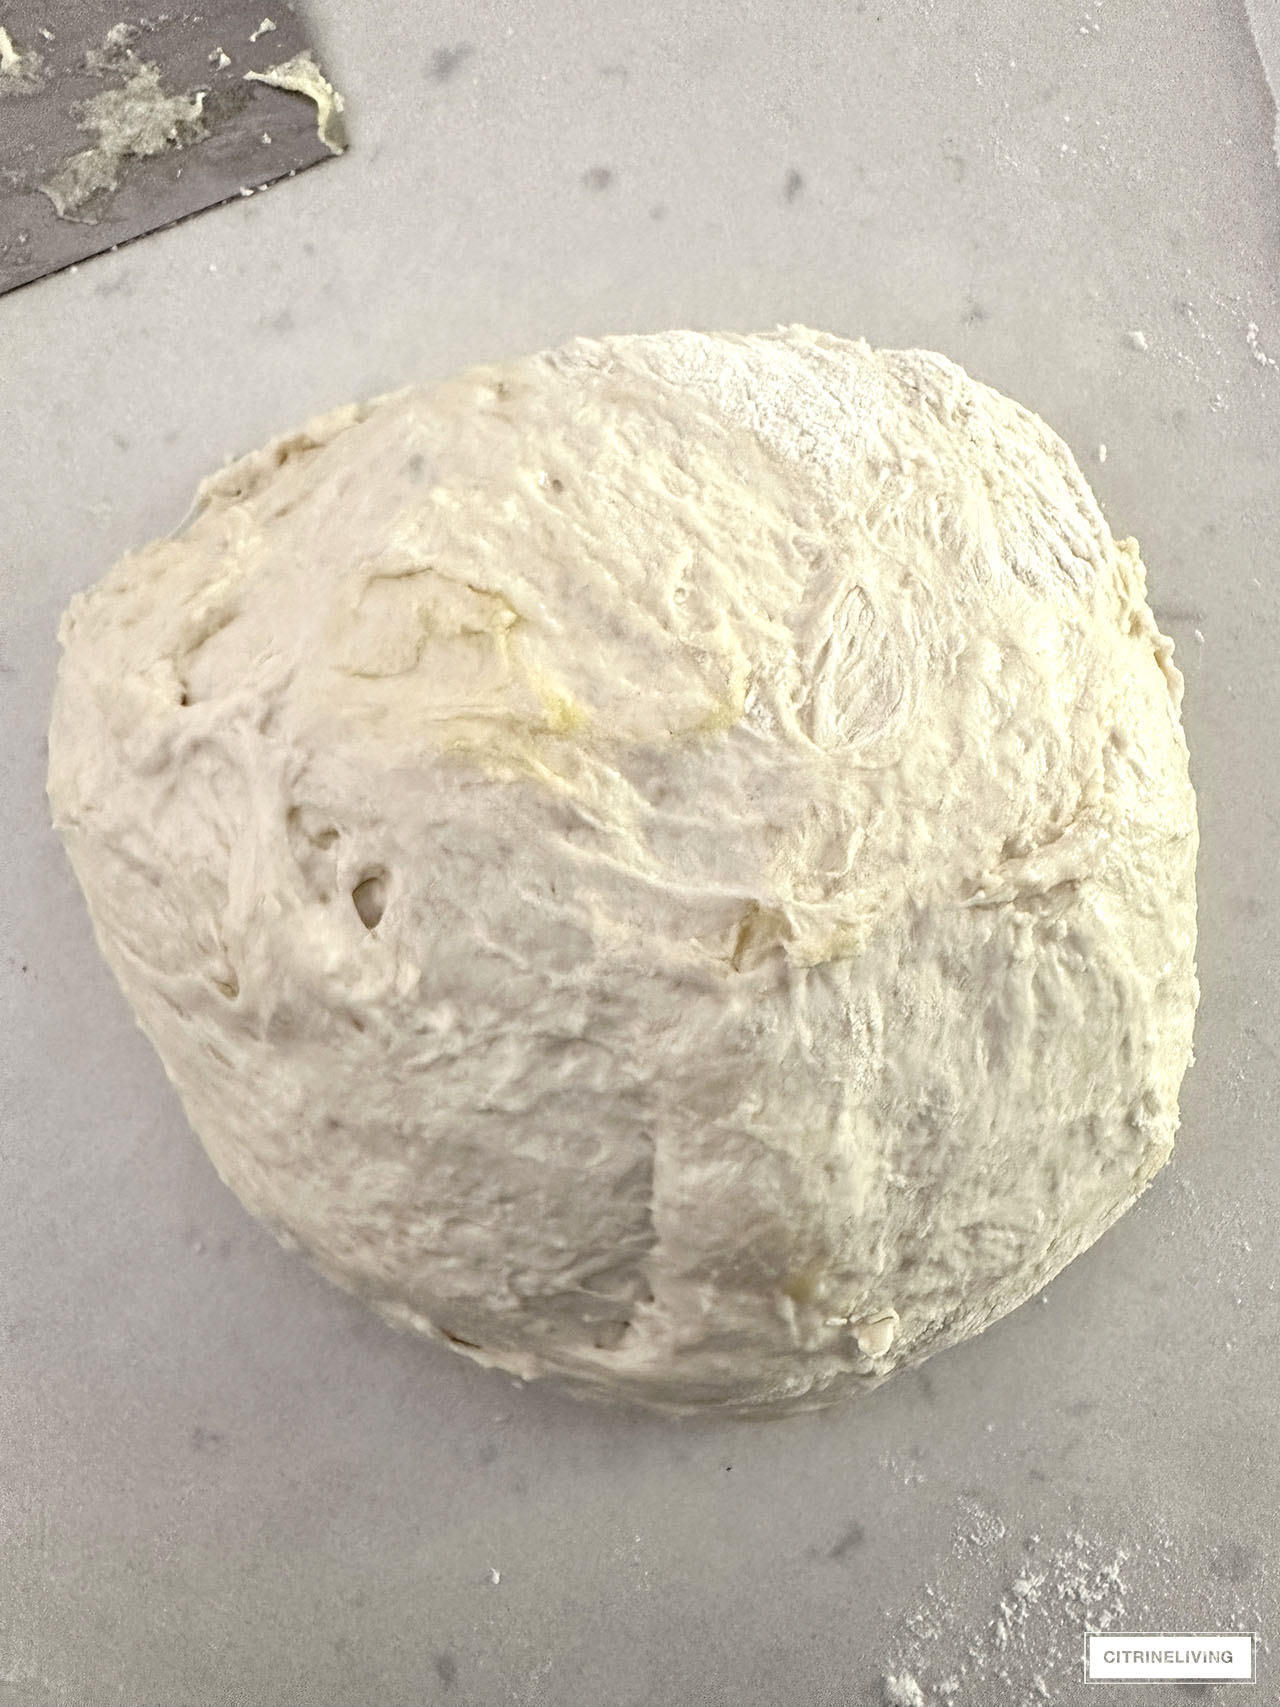
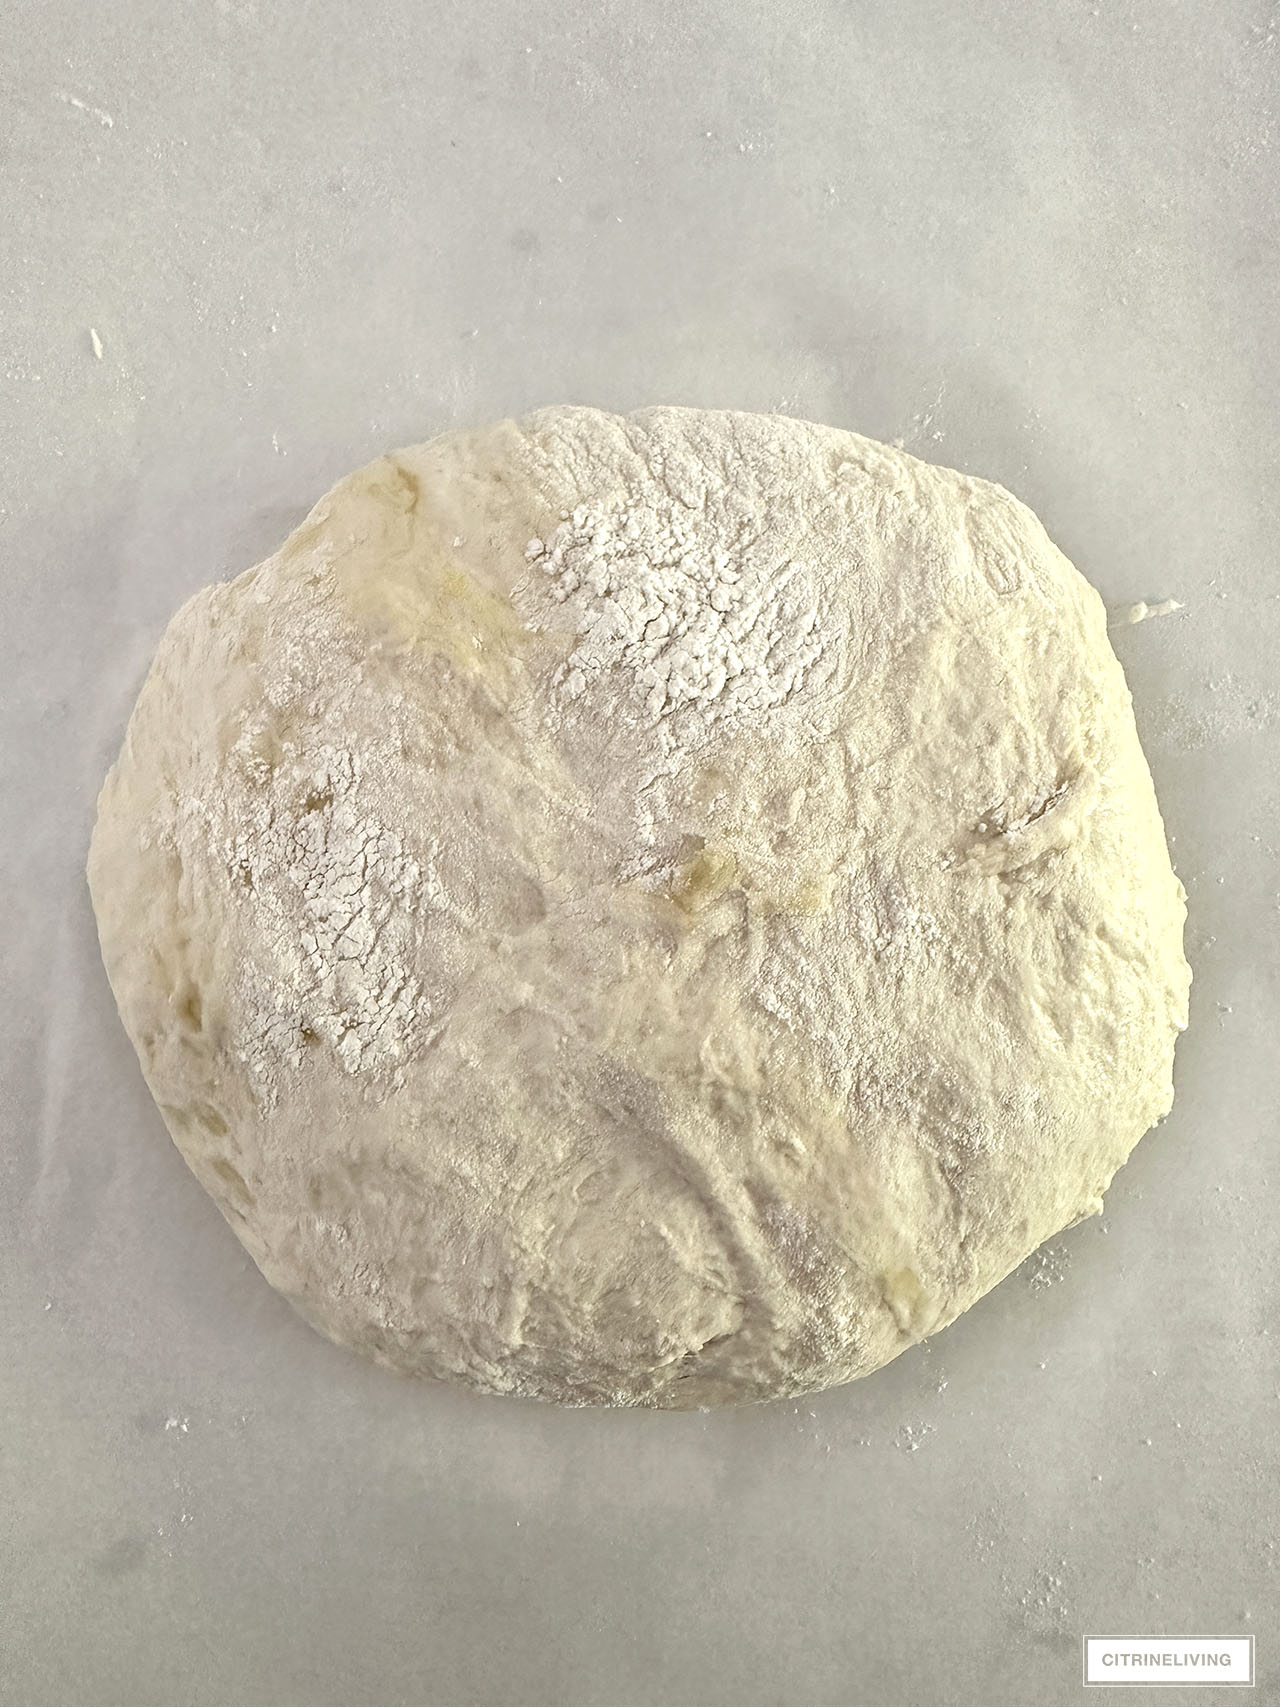
- Tear a piece of parchment paper large enough to fit into your dutch oven and place it next to your work surface. Flour your work surface. Using your spatula, scrape the dough out of the bowl, onto your floured work surface. It will be messy, it’s ok!
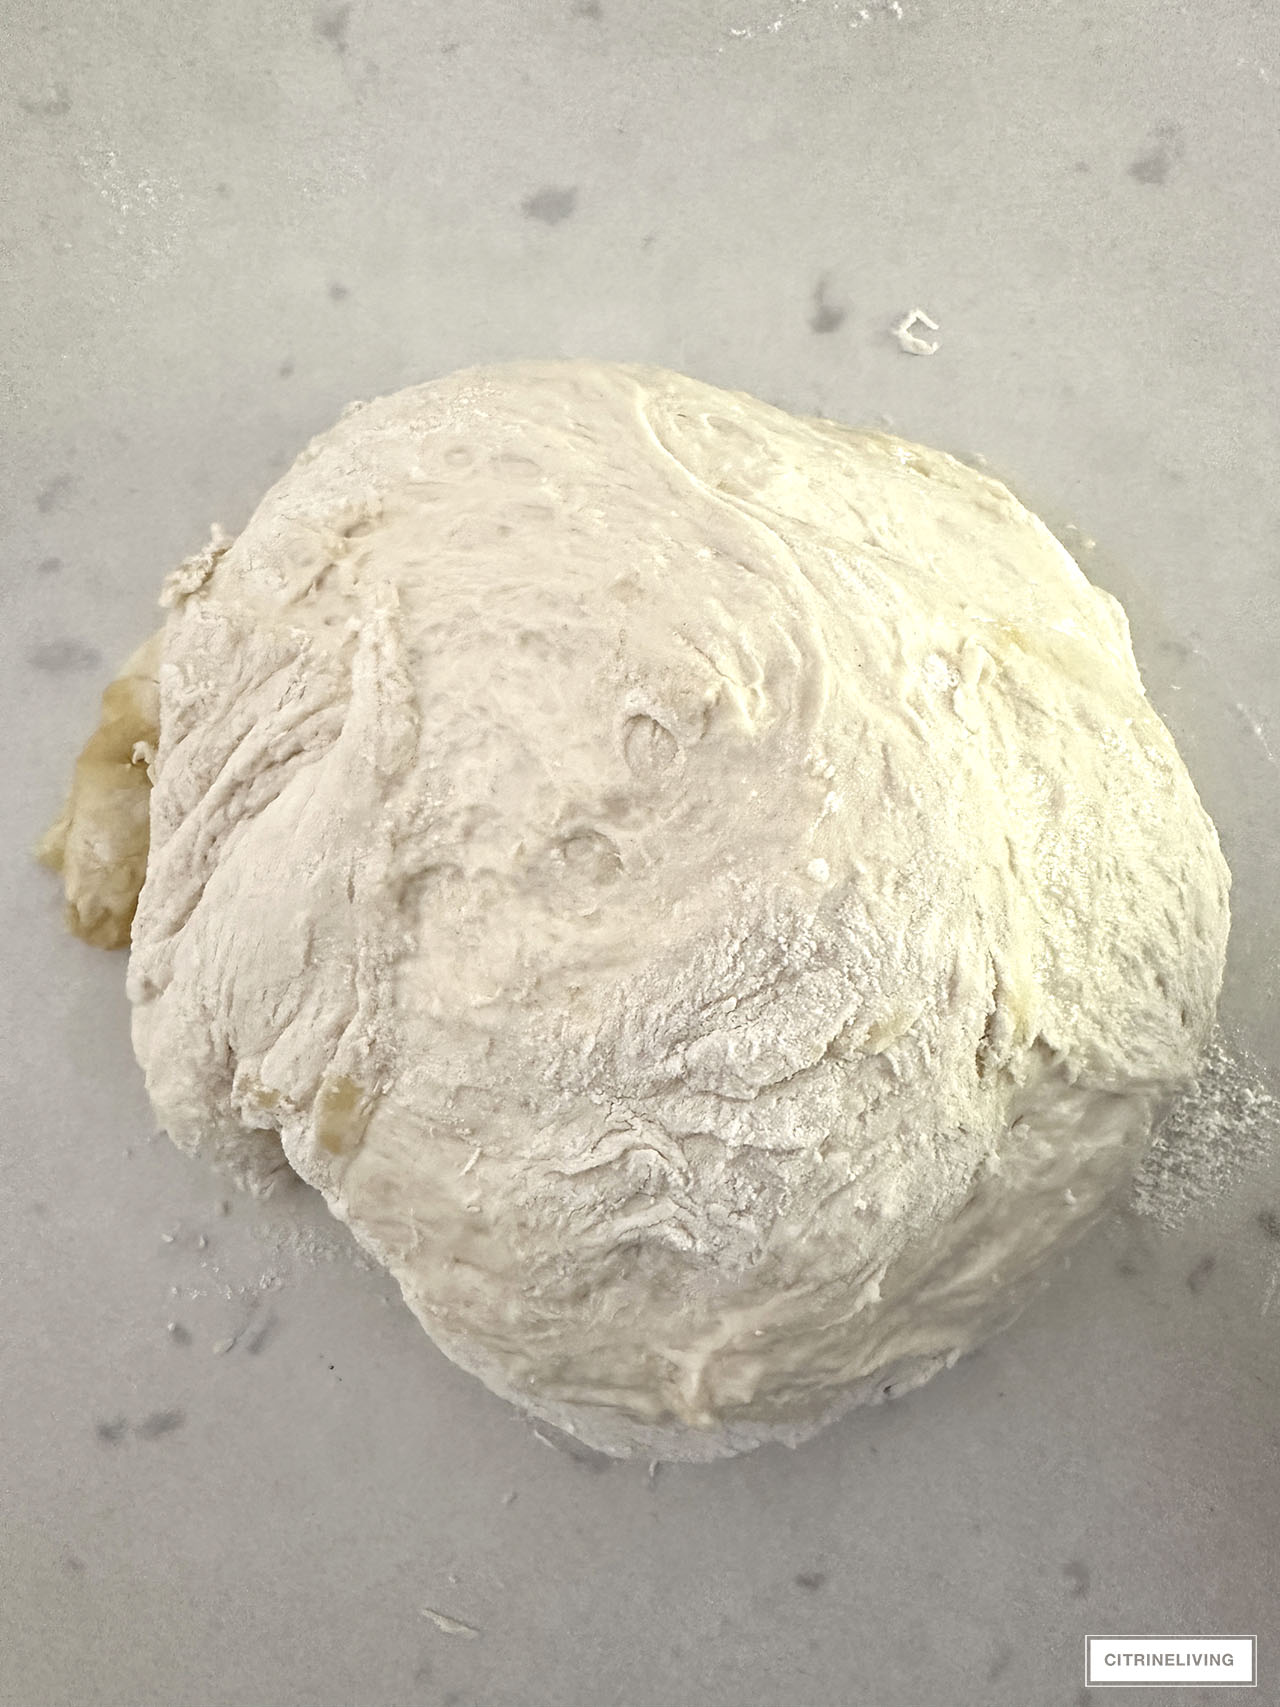
- Sprinkle some flour over your dough. Using your spatula or a scraper (I prefer the scraper), fold the dough in half, onto itself. Continue to fold each side, going all the way around the dough, shaping as you go, until you get a rough ball shape – about 4 or 5 times. You can add extra flour as you go if it’s too wet. Really, you can’t get this wrong!
- Transfer the dough to the paper, I like to use my scraper to pick it up. If you need to reshape it again into a ball, that is fine, there are no rules! I’ve made this bread in my oval dutch oven with a more oval shape. Anything goes, this dough is very forgiving!
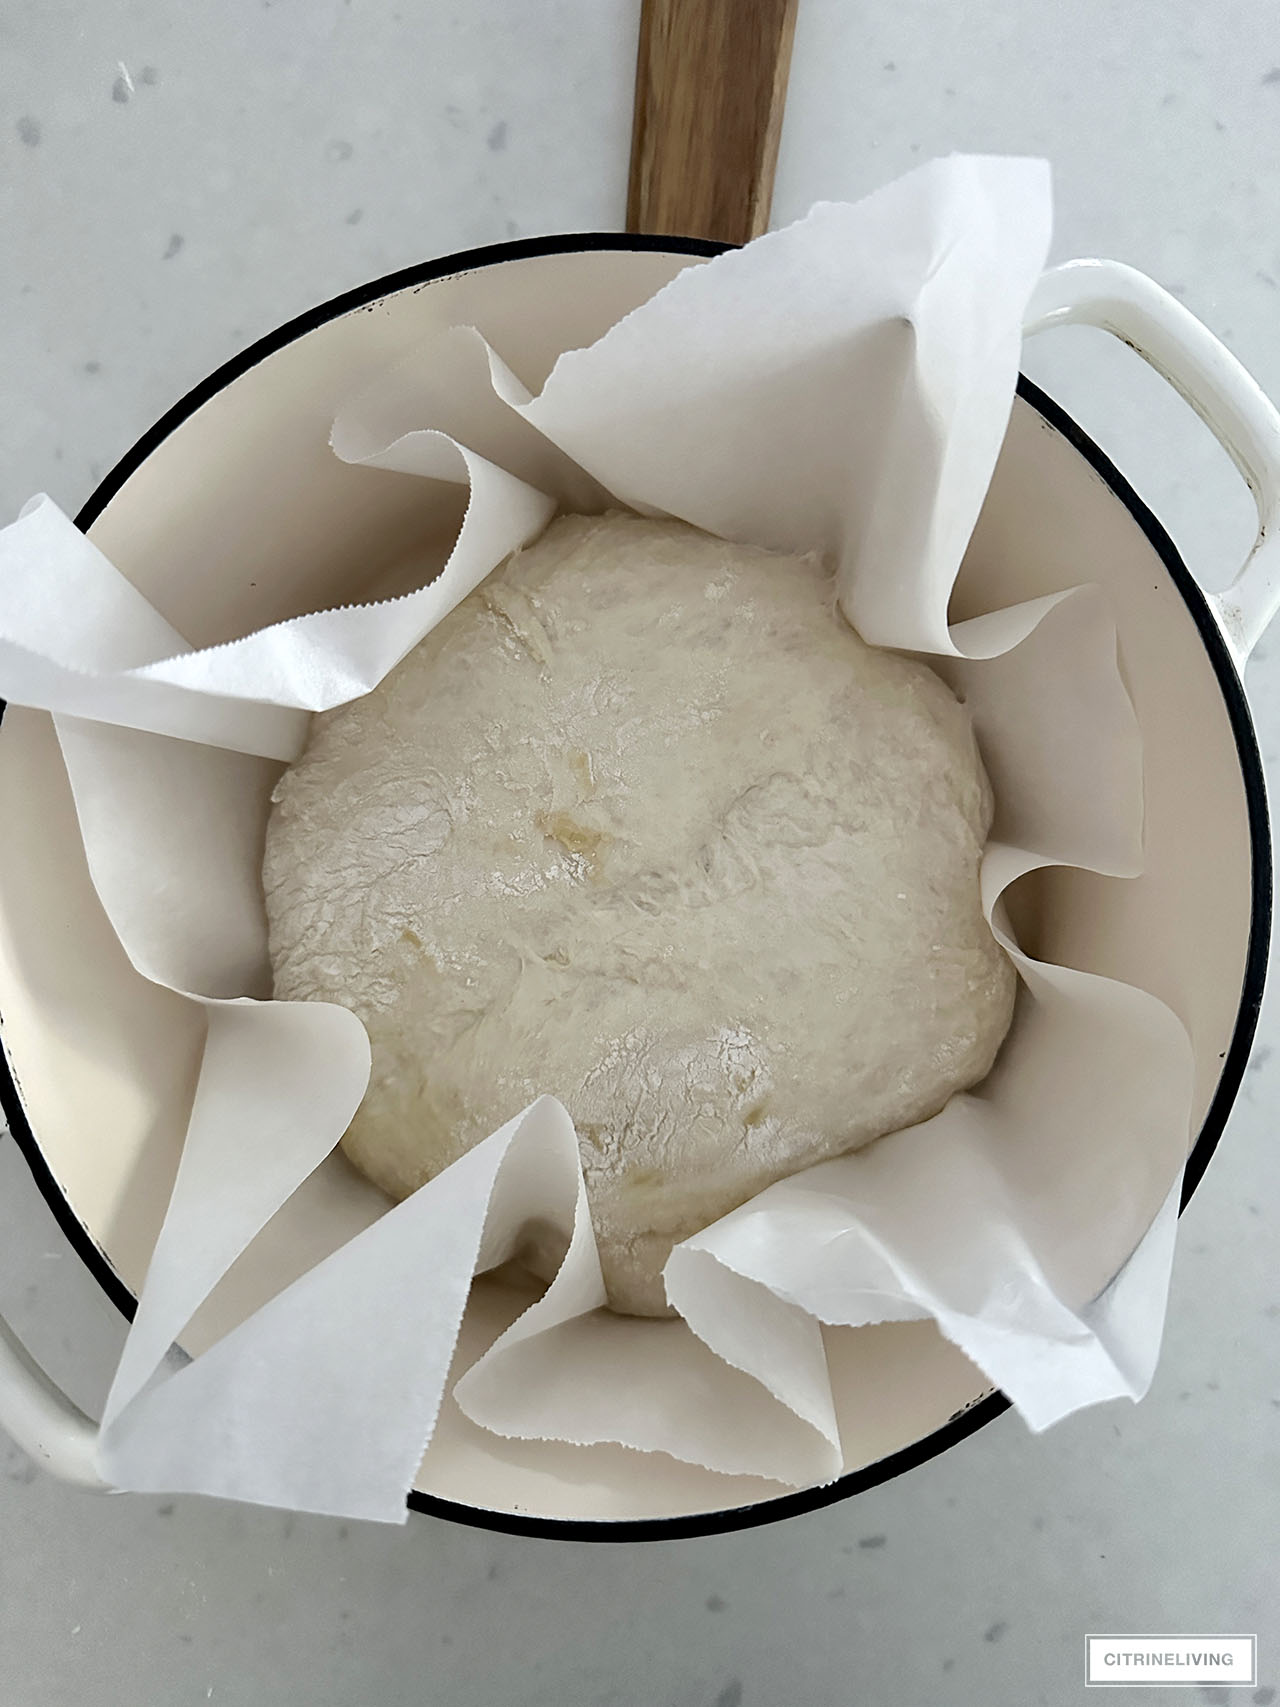
- When the oven is ready, carefully remove your pot and the lid. Grabbing the corners of the paper, lift the dough and place into the pot. Cover your pot and put in the oven. After 30 minutes, remove the lid and continue to bake for another 5-10 minutes for deliciously crusty bread and golden color.
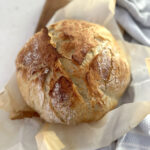
- Remove from the oven and transfer (using the paper) to a cooling rack. Let it rest for at least 10 minutes before slicing. Top it with anything – salted butter on warm, crusty bread is heavenly!
SHOP KITCHEN TOOLS
Dutch oven | Cutting board | Measuring cups | Measuring spoons | Bench scraper | Spatula | Parchment paper | Turkish hand towel | Oven mitts | Bread knife | Cooling rack
THE BREAD MAKING PROCESS STEP BY STEP
These photos are a good reference to use when making your rustic artisan bread. Your dough might look a little different than this when you’re folding and shaping – don’t worry! You really can’t mess this recipe up.
Although the dough is very easy to manipulate, it is messy! I like to use surgical gloves to handle the dough while I’m working. The scraper is great for cleanup too.
Rustic Artisan Bread
Simple, delicious, no knead, crusty homemade bread in a just few hours!
Ingredients
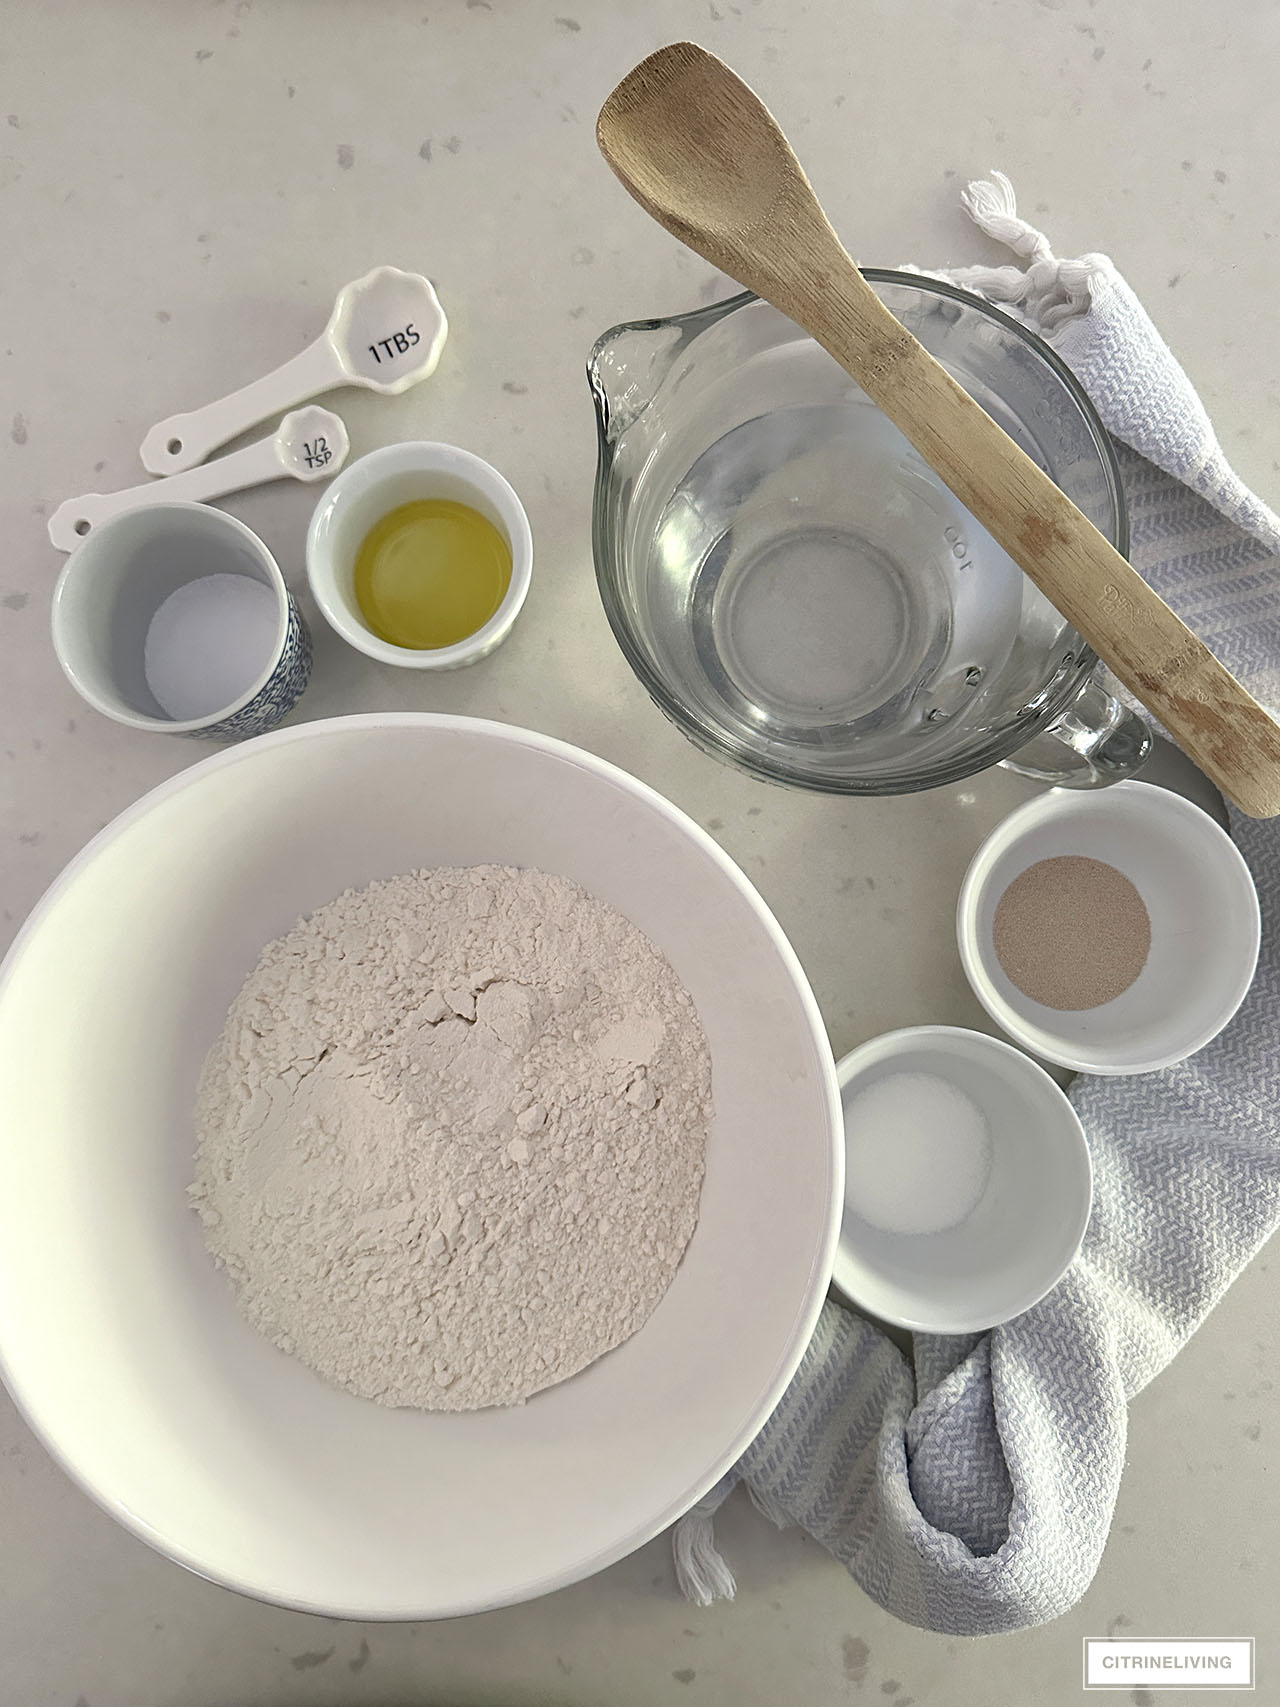
- 3 cups flour All-purpose flour, bread flour or even fine Italian pizza flour works, I've tried them all! **Your water does need adjusting depending on which one you use.
- 1 tbsp sugar
- 2 tsp quick rise yeast You can use traditional yeast as well.
- 1.5 tsp sea salt or course salt
- 2 tbsp olive oil
- 1.5 – 2 cups warm water A touch warmer than room temperature is fine. When using all-purpose flour, you need more water (closer to 2 cups). If using bread or Italian flour use less – around 1.5 cups should be fine. You can adjust accordingly as you mix, so start with less to be sure and work your way up.
Instructions
-
Mix dry ingredients together in a large bowl. Add the warm water and 1 tablespoon of olive oil. Mix everything well with a silicone spatula (or wooden spoon if you prefer), scraping the sides of the bowl – your dough will be sticky and shaggy. As I mentioned above, if you're using all-purpose flour, I find 2 cups of water is needed. With bread or Italian flour, 1.5 cups should be fine. Whichever flour you are using, start with less water and add more as needed if it is too dry.
-
Optional – drizzle the remaining tablespoon of olive oil over the top of your dough. I never actually measure this, I just pour it over the top!
-
Cover the bowl with plastic wrap and a tea towel. Place in a warm spot to rise – I like to use the oven with the light turned on. You can leave it at room temperature as well if you prefer. After about 2 hours, your dough should be double in size. It's ready!
-
Place your covered dutch oven on the middle rack of your oven and heat to 450 degrees. You want the pot to be hot!
-
Place a sheet of parchment paper to the side of your work surface, large enough to fit into the dutch oven. Lightly flour your work surface. Using your spatula, scrape the dough onto your work surface. The dough will be wet, loose and oily – don't worry!
-
Sprinkle some flour over the top of your dough. With your bench scraper or silicone spatula, fold the dough over and onto itself in half, repeating four or five times from each side, shaping as you work, until a rough ball shape is formed. Using your scraper or spatula, gently pick up and transfer your dough to the center of the parchment paper. You might need to reshape it, that's fine.
-
When your oven has reached 450 degrees, carefully remove the dutch oven and remove the lid. Pick up the corners of the parchment paper and transfer your dough to the dutch oven. Carefully cover the dutch oven with the lid and place into the oven.
-
After 30 minutes, carefully remove the lid and continue to bake for another 5-10 minutes. Remove the dutch oven, place on the stovetop. Carefully lift the bread, by grabbing the corners of the parchment paper. Place onto a cooling rack and let cool slightly before cutting. Slice and serve warm with room temperature butter or anything your heart desires!
Could this rustic artisan bread look any more beautiful and delicious? I promise, you will become addicted to making this because it is just so good and so simple. Make sure you save this recipe, you will be making it on repeat! I’d love to know how it turned out for you – leave me a comment below and let me know! Thank you as always for reading with me, I’m excited for you to try this – enjoy your baking! xo


Hi! Thanks for the note! It is not listed separately as it says to mix dry ingredients in the first step, yeast and sugar are dry ingredients. Hope this helps!! And hope you enjoyed the bread!
Notably, the recipe doesn’t say when to add the yeast/sugar… I know to add it to the warm water myself but as this is a beginner/easy focused recipe it really should have been expressly written!
I love that! I make it all the time too – we can’t get enough! Thanks so much for sharing, I love that you like it!
I make this bread three times a month minimum!! It’s so good and easy to make!
I’m thrilled you liked this recipe, thank you for letting me know! You can’t mess it up! I’m not sure what makes the difference to be honest – you can also try this without the oil, I’ve done it both ways and both are delish!
I was specifically looking for an Italian bread recipe and this came out really nice and tasty. I assume the difference between this and french bread is the addition of olive oil which gives it a slightly different taste. NOTE: I sprayed parchment paper with some canola oil since my cheap paper in the past has stuck to the loaf.
Haha I’m happy it worked out, yay! Be careful, you will get addicted to making it! Enjoy! xo
Thank you so much for all the advice! This is BY FAR the best and easiest crusty bread recipe I have found. It’s true, you really can’t mess this one up. Lol! We absolutely love it!💕
You can use it when it’s doubled! Honestly, even if you waited the 2 hrs, you really can’t mess this bread up! I find the speed it rises depends on temperature of the water and the space the dough rises in. I’ve even used warmer water and warmed my oven quickly first and then turned it off, and put my bowl inside to get it to rise faster if I’m short on time. I hope this helps! xo
Do I need to wait the full 2 hours for rising? Or just when the dough is doubled in size? It seems that if I wait the full 2 hours, the dough seems over proofed. It already looks doubled in size by the 1 1/2 hour mark.
Marianne, I’m blown away! You are so kind to leave such a wonderful review and message. I feel blessed, truly! I’m thrilled you love this bread recipe! And yes – it really does bring joy! Thank you again! xox
Hi! Honestly, I am not sure! The dough is usually very sticky and wet, so I don’t know about handling it at that point, but you can always try – let me know what happens! xo
Can I do a stretch and fold half way into the rise?
Making homemade bread has become my new, recent hobby. This was the third recipe I’ve tried. I didn’t really know what kind of bread I was looking for because there are so many flours and grains and styles…
However, I’m asking myself now if could I be so lucky as to find The Best recipe for The Best Bread only three recipes in??? I could make the case.
This bread is fabulously delicious And easy to make And calling for a few common ingredients And doesn’t require kneading And raises and bakes in just a few hours.
Did I mention it was fabulously delicious? Crusty outside, tender and springy inside. I’m making another loaf soon for a friend and I know she’ll enjoy it. In the meantime, my husband and I will be feasting with a smile on our faces. I’m glad I found this site and recipe. Thank you in advance for all the joyful delicious days ahead!
I’m so happy you love it and you found it easy! It’s a regular staple in my home, it really doesn’t get easier!
Love, love, love this recipe. The hardest part for me was to trust the simplicity of the recipe! I knew it couldn’t be that easy as I have been baking bread for years. Searches for a rustic recipe and found this. It will definitely be a regular part of my repertoire going forward. Thanks so much.
Brian
Oh no! I’m so sorry to hear that – you shouldn’t have to do a 2nd proof. Maybe the water wasn’t warm enough to activate the yeast – that can happen! Or the room temperature is colder and it didn’t rise enough. Or, possibly too much water as you mentioned, but by the time your dough is folded and in a ball shape it shouldn’t really be wet or sticky anymore. I’m trying to figure it out! From my own experience, you have to play around with the water/flour ratio, depending on the type and/or brand of flour, as they all vary so much, I talk about this in my post. I feel so bad it didn’t turn out for you! I hope you give it another try!! Maybe a different flour can help, but start with less water (1.5 cups) and slowly add more if needed. Good luck if you try again! xo
Followed instructions to the T.
After its final bake, this loaf still looks like a deflated dough ball. Maybe I added too much water, but I feel like she needed a 2nd prove? I’m waiting to see how she turns out after another 15 minutes in the oven but it’s not looking so good over here, unfortunately.
Ok I’m back. This bread is flat. I think it needed a second prove. Bummer.
I’m so happy to hear that, thank you so much!
Your bread recipe was easy to follow and make. My husband likes the
Taste.
Thank you
Hi Robert! SO happy it turned out! I can honestly tell you it’s trial and error! I personally prefer the result with all purpose or Italian 00 flour. All flours are different and they can even vary from brand to brand (all purpose from different brands, for example). I’m often experimenting with different flours to see! Bread flour and Italian give a chewier crumb (the inside) because of the higher protein content, so I think this is what is happening for you. Also, always make sure you let it cool a little before cutting it as it can become gummy if it’s too hot. I hope this helps!! Thank you for stopping by!
Turned out just like the pictures (wish I could show).
Question: Used bread flour. The crust turned out perfect and the inside was just ok, a little too moist even though I got to an internal temp of 205. Should I cut back on water or modify the covered vs. uncovered cooking times?
Hi! Don’t stress! It should still come out fine – it will rise when it bakes! The dutch oven helps with that as well. Sometimes if my dough sits too long after I’ve shaped it it will flatten also…it always turns out! Please let me know what happened, I’m curious!
I used bread flour and followed the recipe as written. However the dough didn’t shape into a ball. It flattened. Went ahead and baked it. Haven’t tasted it yet. The second batch did the same thing. The second batch I added more flour, and still it’s flat and not a ball. What am I doing wrong?
Hi Helen – I am SO happy you love it!! Thank you for letting me know! I totally agree – why buy it when you can make it so quickly?! Enjoy!!
OMG, we love this bread. I had been making artisan bread that needed to be started the night before, I love that I can have a loaf in 3 hours. It’s so delicious, I’ve stopped buying bread in the store. Everyone that’s had it at my house wants to learn how to make it, lol. Today I’m making 2 loaves for dinner, one I will add some cheese and garlic, should be delicious
Thank you.
Helen Bagley
Hi! So sorry for not seeing you comment right away! If it’s doubled I think it’s fine to use it! Either way you can’t mess up this recipe!
I followed this recipe a few days ago to make some loaves for my family. They loved it! I decided to make a couple more tonight, and im checking at the hour mark on the dough and it has already doubled in size. Could I use it now or should I wait another hour or so?
Hi! Thank you so much for letting me know! That sounds interesting! I really can’t say for sure, as I’ve never tried it, but my guess would be less time for a smaller loaf! You’ll have to do some experimenting! I wish I was more help!
This bread was absolutely delicious! Id like to use this same recipe but make a bunch of smaller loaves.. would the cook time be the same?
Hi! I’m so thrilled to hear this, I love that you love it and found it easy! Thank you for letting me know! xo
BREAD BOMB! This was probably the easiest most delicious bread I’ve ever made! Easy enough for my grandkids to help with…both the prepared as well as the eating 😋
Bread perfection thanks for the clear concise directions
Off to get my piece if there’s any left
That is awesome, wow, I love that! Thanks for letting me know, enjoy!!
I love this brand so much when I travel to see friend and family, I ask y dutch oven with me. Everyone loves good soup with fresh bread. It’s easy and delicious. Thank you for crafting this recipe.
I’m so happy that you and your family love it! Thank you so much for letting me know! xo
I just wanted you to know that I tried your recipe and it was AWESOME!!! I brought a new dutch oven and wanted something to cook besides a pot roast. This recipe didn’t disappoint. It is family approved
Oh I love it, it’s so good when it’s warm!Thanks for telling me and you’re so welcome!
Thank you so much for letting me know, I am so happy you love it – and your hubby! It is a staple in our home!
such a great recipe! one loaf just out of the oven, and baking another tomorrow, thank you!
By far the best recipe for artisan bread. It’s the olive oil and the tablespoon of sugar that makes this so awesome!!! I’ve made artisan bread many times but found it to be bland. Found this recipe and I’m very pleased with how my bread turned out. Husband approved too!
I’m so happy to hear this, thank you!! It’s such a great gift that people love! xo
I’ve made this bread several times and even gifted it. It always turns out perfect, and everyone loves it!
I’m so happy to hear you love our bread recipe! You will be making this on repeat, I’m pretty sure! It’s a staple in our home. Thank you so much for leaving your comment! xo
I have tried to make arttisan bread similar to this before but they were the type that only used yeast, flour, water and salt. While they looked beautiful, they were very bland. I have only had sucess with enriched dough breads that called for eggs etc. Today I was out of eggs but wanted a loaf of bread to go with some homemade soup. So I searched again for artisan bread recipes and found this one. It was quick to thow together and more importantly it had a wonderful taste and texture. The rustic, crusty bread of my dreams. Thank you so much for sharing it.
That’s wonderful to hear, I’m so happy you liked it! Thank you for letting me know!
So easy to make and turned out gorgeous, will definitely make again!
I’m so happy to hear this, thank you for sharing! You really can’t mess this recipe up! Enjoy! xo
I’ve tried a few diff bread recipes but one is amazing!! It seems almost fool proof and it came out so good! My father in law who is a bread expert also loved it. I will be making this recipe again and again. Thank you!
Hi! I mention this tip in my post – hopefully this helps! You can use a baking sheet for your bread, and a baking dish filled with water on the rack underneath to create steam in the oven as your bread is baking. I’ve never tried this but it is supposed to be an excellent method!
Hi, can you recommend a different pan. I don’t have a Dutch oven. Thanks
That is so fun to hear! I’m thrilled it’s a hit in your home – it doesn’t last long around here either! Thanks for letting me know you love it!
I made this today. It lasted about 15min after I pulled it out of the oven. And 10min of that was on the cooling rack. Kids and wife absolutely loved it. Fresh baked warm bread with plenty of butter and maple syrup.
I’m just about to make a second loaf so we can have it for lunch tomorrow.
Highly recommend this recipe.
Hi! I’m so glad you like it, thank you! Experimenting really helps – I get different results with different types of flour and even different brands of flour! I’m happy you found what works for you!
This bread is wonderful! Upon my second time making it, using regular flour both times, I found I did not need two cups of water. So, I would do as she suggests and add a bit of water at a time until you get the right consistency. 🍞 ❤️
Wow sounds SO good! Thank you for sharing your tips! I’m so happy you love this recipe!
I’ve made this recipe several times, it’s the easiest & best. I’ve leveled up a bit. To the dry ingredients I add fresh coarce black pepper & shredded Italian cheese. I use 1/2 – 3/4 cup. But you can adjust.
Hi Kelley! I am so thrilled you love this recipe! It’s on repeat in our home all the time. It really is so easy you just can’t mess it up! I personally haven’t added anything but some readers have shared that they have, and loved it! I say try whatever you want! Thank you for stopping in to let me know you loved it! xo
Just a quick thanks for the great recipe. I’ve been trying to master sour dough with no luck.. feeling a little discouraged I thought I’d look for something that would be a winner and this recipe is that and more! So light and fluffy, beyond what i was expecting from an artisan bread.
Just wondering if you ever add extras, like cheese or everything seas0ning to your loaf?
Hi Mary! I think I forgot to reply to you – so sorry! Thank you for the 5 stars and for the wonderful feedback! I have to try melted butter – so yummy! Thanks for the tip! I’m truly thrilled you love this recipe so much! xo
Jennifer, thank you so much for such wonderful feedback! I love that you’re able to create so many variations of your own! I love this recipe so much because you really can’t get it wrong! I’m thrilled your family loves it and that it’s so versatile for you! Thanks for dropping in and taking the time to let me know! xo
This recipe is requested by my family as the main go to. I started making my own bread approx. 20 years ago in my 20’s and it became a way of relieving stress for me. Today with a family, its not as easy to take that much of my time but This recipe allows me to be so versatile in a workable amount of time. I have kneaded this dough recipe and added more flour and it will rise to amazing heights while baking covered. It has been wonderful for sandwiches, BLT’s and even french toast when it goes beyond prime. You can add anything you want to the dough for the type of dish you are intending it to accompany and it won’t disappoint. I have added caraway seeds, jalapeños and cheese, black pepper to name a few. Thank you for sharing this recipe that is both easy and can be used however a person wants!
Hi! Mine is 5 liter!
Hello. I was wondering, what size Dutch Oven do you use when baking?
Hi! Thank you so much – I am so happy to hear everyone loves it! You can easily reheat this bread – it’s a technique I recently discovered! I don’t think you need to refrigerate (but you can always try), you generously sprinkle water allover the loaf, and pop it back into the oven – try 350 for about 10 minutes – it comes out fabulous. I usually put it in a pan or foil to do this. Good luck! xo
Hi Karl! So happy you liked it, yay! It is possible you used too much water, but you would know by how loose and wobbly the dough is. I’ve also never used self-rising flour, so that could be it? If it bakes fine and the end result gives you a nice shape then you’re good! My loaves often come out a little different, depending on the kind of flour I use, or sometimes it rises differently, sometimes it’s chewier than others. But it’s always so good haha! I hope this helps! Thanks for trying it, I hope you continue to make it!
Thank you very much! I’m so thrilled you like it! Honestly, I have no idea, but possibly the water temperature, which I know can have an effect on the yeast reaction. I’m no expert but I know that can change you much the dough rises…I’m sorry I’m not more help! Thank you again for the kind words! xo
I absolutely love this recipe. It was the first bread recipe I tried and it’s a keeper. I have made it four times now and my family uses it for sandwiches just to eat toast everything.
I did have one question. I do everything the same each time I make it, but I have noticed sometimes my Bread is not as big as other times. Can you let me know what that might be that I’m doing to make that happen? Of course more is better.
I made my bread for the first time today. Everything turned out great. However my dough didn’t stay in a ball shape, it kind of flattened when sitting on the parchment paper. I used regular self-rising four and added about 1 3/4 cup of warm water. Is it possible I didn’t need the extra 1/2 of warm water? I used my scrapper and added flour and folded it, repeating this 4 times (flour, fold, flour fold, flour fold). Any suggestions? Thank you.
I love your bread recipe! It was the first bread I made on my bread making journey and out of all the loaves I’ve baked this is still my families favorite and the one i make most often 😊 just so easy and so delicious! would it be possible for me to make the dough a day or two ahead of time and just leave it covered in the fridge until I’m ready to bake?
I have tried several different Rustic Artisan Bread recipes, and this one is by far my favorite. The addition of melted butter or olive oil really brings a nice flavor to the bread, and I have now made it several times, even gifting several loaves. I have made your recipe as written and have also used a combination of different flours, all with great success! Thank you for posting such a fantastic and easy recipe.
Oh, you have me stumped! I don’t know the answer to that, I’m sorry!
What is the preferred internal bread temperature?
I am so happy to hear you love this recipe and that you’re sharing it with your neighbors – how fun! Thank you for the very kind words and for letting me know, I am very grateful! Keep enjoying, God Bless! xo
Thank you for your amazing recipe. I was going to just bake one for myself but decided everyone on my block needs to try this. So I have been baking my socks off. I’m now on my 10th loaf in two days. I can’t believe how easy this is and so delicious. This will forever be my favorite recipe by far. I’m almost 80 years young and have made plenty of bread but this recipe? Can’t stop!!! Love love love it! Fondly Micaela
I’m so happy you liked it – you’re very welcome, it’s my pleasure! It is a staple in our house, you’ll be making this all the time! Thanks for the kind words! xo
First time making bread (I cook all the time, never made bread though) and it was incredible. Great instructions and super simple! Thank you for sharing!
I think you’re going to love it! Thank you for stopping by! Enjoy! xo
Just took it out of the oven. OMG it smells so good. I can’t wait till it cools off so I can try it.
Hi! Sure you can! The method is a little different – activate the yeast in the water first, then add to your dry ingredients!
How could I adjust this using traditional active yeast?
Thank you so much for the fantastic feedback! I’m thrilled everyone loved it so much! I make this weekly, sometimes twice a week! I hope you continue to enjoy it! xo
Wow! Came out great and my family loved it. Best bread I’ve baked lately. The crust was tender and great rise. My only issue was i only made one loaf. First time using a Dutch oven for the bread bake and was successful. Thanks for sharing the recipe!
I’m so happy you and your husband love it! It really is so simple! Thank you for the feedback, it’s greatly appreciated! xo
I love it, easy to prepare and delicious, my husband love it. I will make it again soon!
I love that you’re experimenting with this! So fun! Who can resist the smell of buttered bread? Delish! Thank you so much for letting me know! xo
I’m so happy you love it! It really is so easy to make, I’m so happy to share and spread the love haha! Thank you so much for the recommendation! xo
Easy to make, delicious to taste! Unlike most bead recipes, this is easy to make and is very forgiving with substitutions. I used avocado oil and 2c AP flour and 1c of whole wheat flower. It had a soft, slightly chewy texture inside and the outside was perfectly crusty. There’s more….it smelled like buttered bread when it was baking!
This recipe is delicious and so easy with such few ingredients. I definitely will be making it again and again. Highly recommend it, we can’t stay out of it! Yum! Thanks for sharing your recipe.
I often use avocado oil in many recipes as an alternative to other oils, I’m sure you can use it for this. You can even leave the oil out if you prefer. I’ve tried without and it is delicious as well, but I’m going to try the avocado oil next time and see!
Can you use avocado oil instead of olive oil?
Hi! That is so amazing to hear, thank you so much for sharing your different methods with me! It’s definitely a recipe you can’t mess up! I’m thrilled you love it! I make it weekly in our house! xo
I’ve used this recipe three times now, using bread flour. The first time, I followed it to the letter and it came out wonderful. The second time, I tried the “stretch-and-fold” method typical to sourdough bread. Again, it came out amazing! Today, I used 2.25 cups bread flour, and 0.75 cups of buckwheat flour and the “stretch-and-fold method, which resulted in a slightly denser, darker colored crumb, with a nutty taste and aroma. But still absolutely delicious!! Thanks for an amazing recipe!!
Hi! I’m not sure if this is exact, I just used an online converter. But here you go – let me know how it turns out! Good luck! xo
360 grams flour
12 grams sugar
7 grams yeast (one package should be good)
9 grams salt
28 grams oil
236 – 473 grams water
Hi! I’m looking to make this but I was wondering what the measurements are in grams?
I am so thrilled you like it and found this easy to follow! Thank you for letting me know! Trust me, this will be on repeat all the time, we’re addicted over here, ha! xo
This bread was easy to make and it tastes fantastic. This was my first time using a Dutch oven. The directions were very clear and easy to follow. I’ll be making this often. Thank you for the recipe.
Oh I am so thrilled to hear this! Isn’t it so delicious?! And the fact that it takes less than three hours makes it so easy. I’m so happy you both loved it so much! Thank you for letting me know! xo
My husband and I just loved how this bread turned out!! It’s perfect for anything that needs bread. We really enjoy it with breakfast foods. Perfect for avocado toast and egg sandwiches or even a slice of toast on the side. Thank you so much for such an easy amazing bread recipe !!